
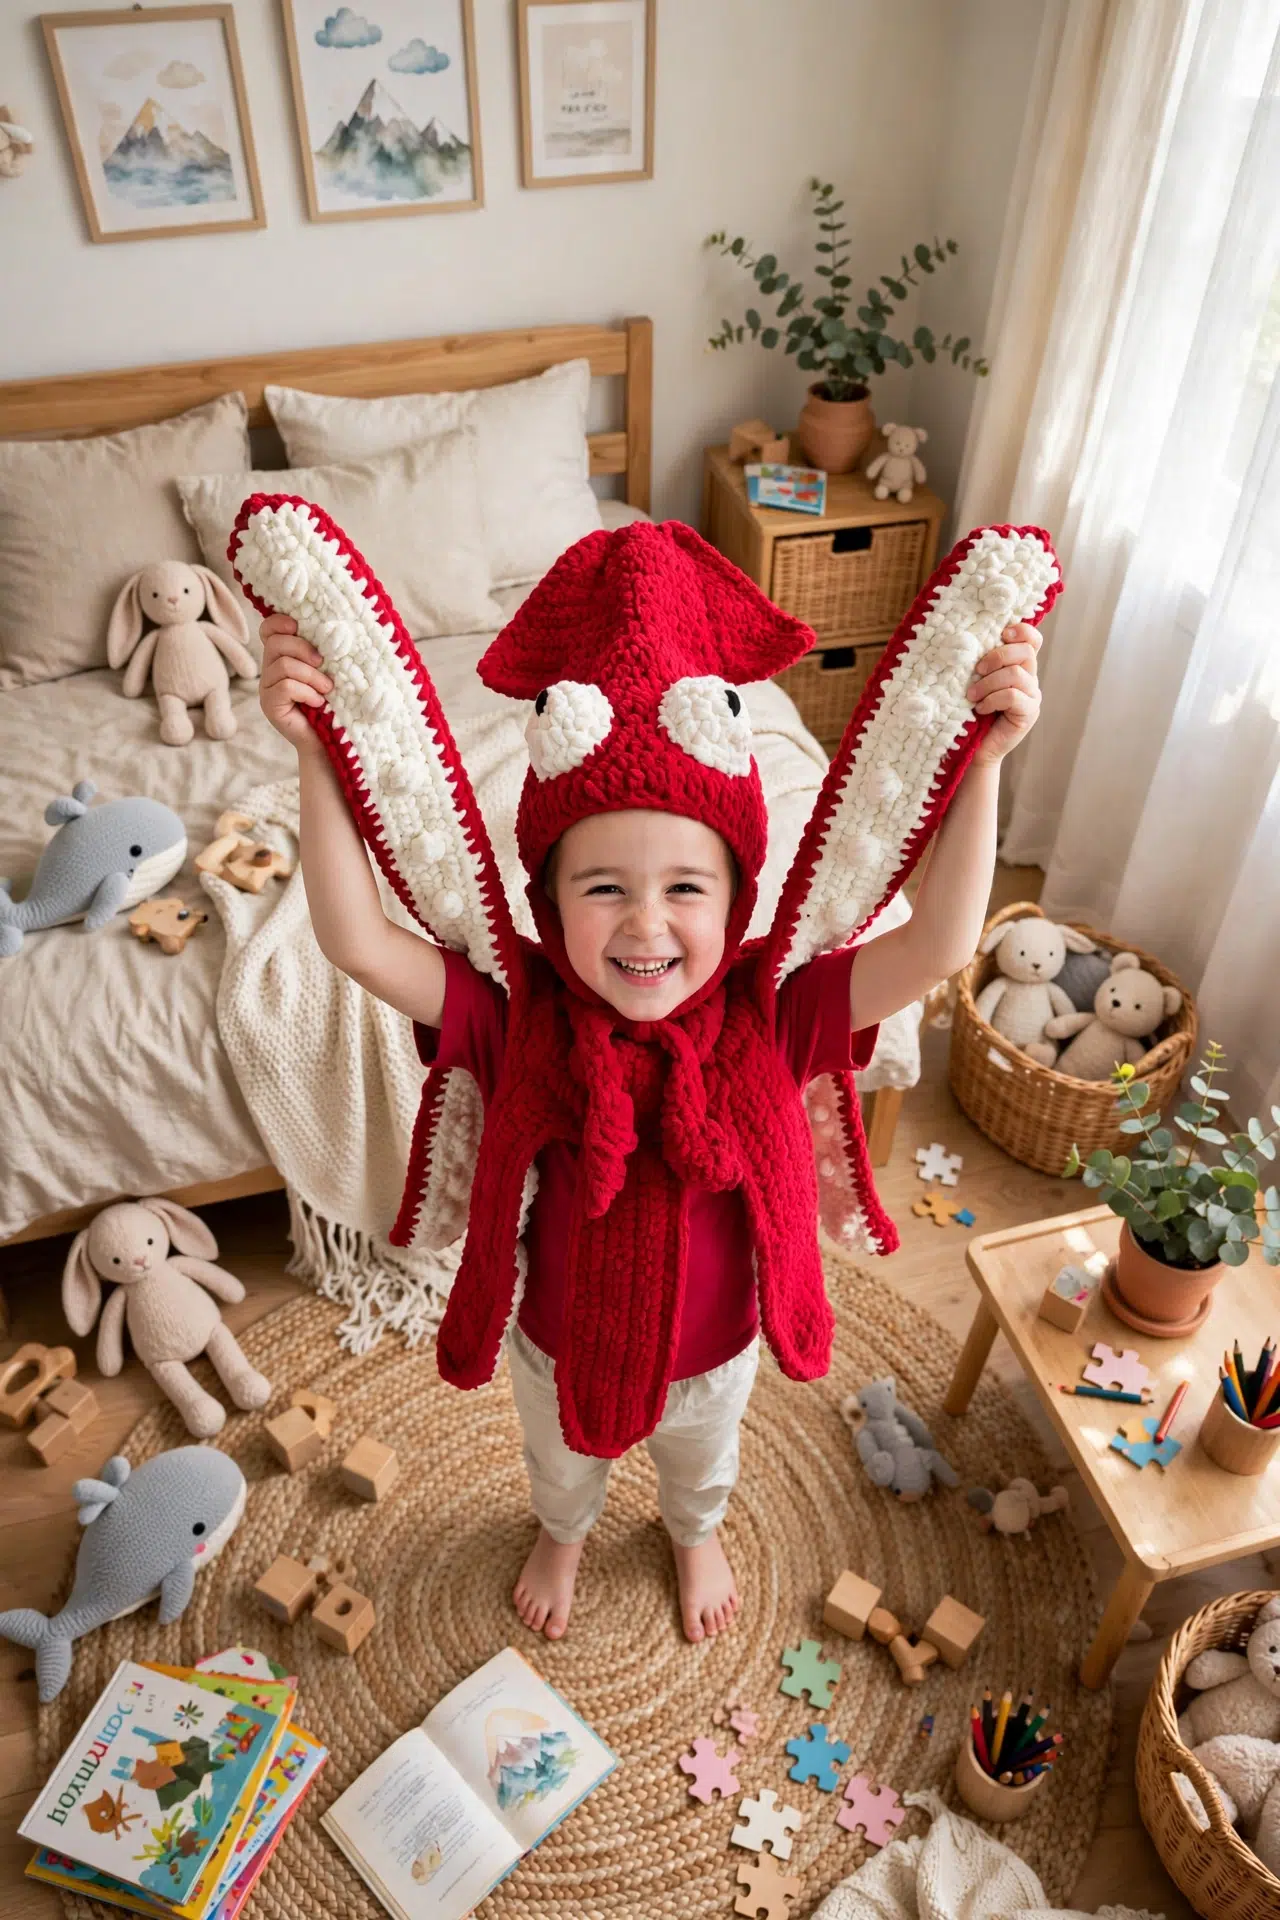
If you've been wanting a playful costume project that feels useful, giftable, and genuinely fun to build, the Giant Squid Crochet Hat & Cape Costume is waiting for your hook. You get a fitted hat, a buttoned cape, fins, eyes, tentacles, arms, and textured suckers in one coordinated project.

Most of the work uses simple hdc and sc, with steady increases and decreases doing the shaping. The pieces are made in clear stages, so you can enjoy each small finish before bringing the whole costume together!
Jump to:
Why This Pattern Is a Keeper
- Straightforward shaping: The hat grows and closes with regular hdc rounds, while the fins use simple sc decreases. You won't need complicated garment shaping or a long list of unfamiliar stitches.
- A comfortable double layer: The separate Head and Inner Hat are joined around the lower edge. That construction gives you a clean foundation for attaching the fins, eyes, and tentacles.
- Built-in cape closure: The ch-2 space forms the buttonhole while you crochet the neckline. There's no separate loop to make or attach later.
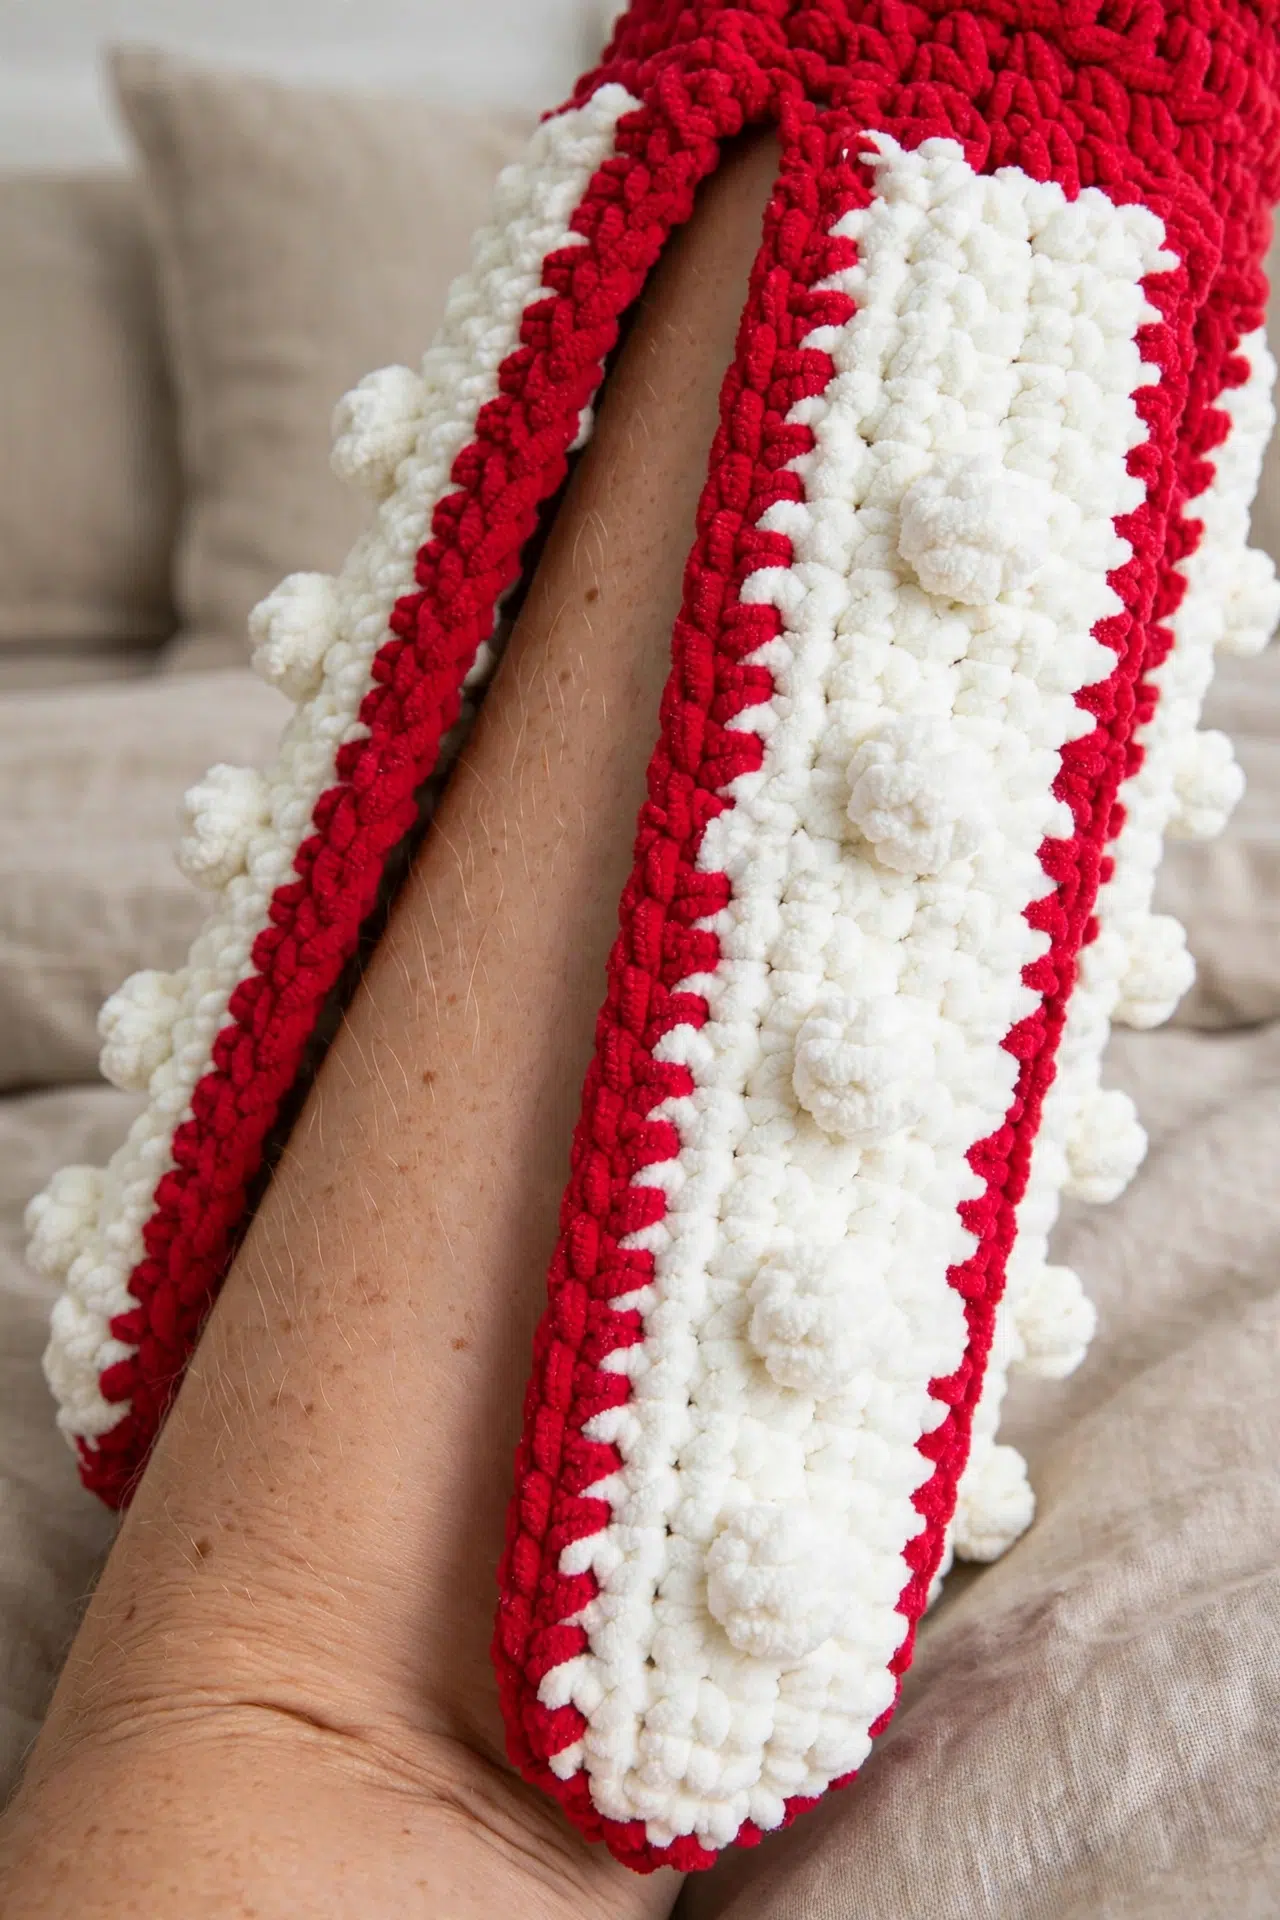
- Texture with one special stitch: The suckers use bobbles for dimension, but the rest of each strip stays in basic sc. Once you've made the first strip, the remaining seven follow the same rhythm.
Pattern Details
- Skill Level: Easy
- Finished Size: Head circumference: Child 18 ½ in. [47 cm]; Adult 23 in. [58.5 cm].
- Gauge: 9 hdc and 8 rows = 4 in. [10 cm] with smaller hook; 8 sc and 13 rows = 4 in. [10 cm] with larger hook.
- Yarn Weight: Super Bulky (6)
- Time to Make: about 12-18 hours
What You'll Need
Gather both hook sizes before you begin, since the smaller hook shapes the Hat pieces and the larger hook handles the Tentacles, Cape, Arms, and Suckers.
- Super Bulky (6) yarn, 10.5 oz/300 g and 220 yds/201 m per ball: Match the listed gauge rather than relying only on the weight label. The Inner Hat must fit inside the Head, so a large gauge difference can make joining the layers difficult.
- Hat, Contrast A (Crimson): Child 1 ball or 204 yds/187 m; Adult 2 balls or 242 yds/221 m
- Hat, Contrast B (Vintage White): Both sizes 1 ball or 13 yds/12 m
- Cape, Contrast A (Crimson): Child 2 balls or 279 yds/254 m; Adult 2 balls or 308 yds/281 m
- Cape, Contrast B (Vintage White): Child 1 ball or 110 yds/100 m; Adult 1 ball or 127 yds/116 m
- Small length of black worsted weight yarn
- U.S. K/10 ½ (6.5 mm) crochet hook, or size needed to obtain gauge
- U.S. L/11 (8 mm) crochet hook, or size needed to obtain gauge
- Yarn needle
- Stitch markers
- Fiberfill stuffing for eyes
- One 1 in. [2.5 cm] button: Test the 1 in. [2.5 cm] button through the ch-2 buttonhole before sewing it down. It should pass through securely without stretching the neckline excessively.
Stitches & Abbreviations
- approx - approximately
- beg - beginning
- ch - chain
- dec - decrease
- dc - double crochet
- hdc - half double crochet
- PM - place marker
- rem - remaining
- rep - repeat
- rnd - round
- RS - right side
- sc - single crochet
- sl st - slip stitch
- sp - space
- st - stitch
- tog - together
- WS - wrong side
- yo - yarn over
hdc2tog: Yo, insert hook in next st and draw up a loop; yo, insert hook in following st and draw up a loop; yo and draw through all loops on hook.
sc2tog: Draw up a loop in each of the next 2 sts; yo and draw through all loops on hook.
Bobble: (Yo and draw up a loop) 3 times in next st; yo and draw through 6 loops on hook; yo and draw through last 2 loops on hook.
Satin Stitch: An embroidery stitch used with black worsted weight yarn to make the pupil in the center of each eye.
How to Crochet the Giant Squid Hat & Cape Costume
Read through the joining steps before you start so you'll know which tails need to remain long for sewing.
Instructions are written for Child size, with Adult size in parentheses: Child (Adult). When only one number is given, it applies to both sizes. For the Head and Inner Hat, do not join at the end of rounds. Work in a continuous spiral and move the marker onto the first stitch at the beginning of each round. Ch 2 at the beginning of a row or round does not count as a stitch. Contrast A is Crimson and Contrast B is Vintage White.
Head
Use the smaller hook and A. Work continuously after joining the foundation chain.
- Step 1: Ch 48 (52). Join with sl st to first ch to form a ring, taking care not to twist the chain.
- Round 1: Ch 2. 1 hdc in each ch around. PM on first st. 48 (52) hdc.
- Round 2: 1 hdc in each hdc around.
- Rounds 3 onward: Rep Round 2 until work measures 4 (5) in. [10 (12.5) cm].
Head Decreases
- Round 1: *Hdc2tog, 1 hdc in each of next 4 (11) hdc; rep from * around. 40 (48) sts.
- Rounds 2-3: 1 hdc in each st around.
- Round 4: *Hdc2tog, 1 hdc in each of next 3 (6) hdc; rep from * around. 32 (42) sts.
- Rounds 5-6: 1 hdc in each st around.
- Round 7: *Hdc2tog, 1 hdc in each of next 2 (5) hdc; rep from * around. 24 (36) sts.
- Rounds 8-9: 1 hdc in each st around.
- Round 10: *Hdc2tog, 1 hdc in each of next 2 (4) hdc; rep from * around. 18 (30) sts.
- Rounds 11-12: 1 hdc in each st around.
- Round 13: *Hdc2tog, 1 hdc in each of next 1 (3) hdc; rep from * around. 12 (24) sts.
- Adult Only, Rounds 14-15: 1 hdc in each st around.
- Adult Only, Round 16: *Hdc2tog, 1 hdc in each of next 2 hdc; rep from * around. 18 sts. (18)
- Adult Only, Rounds 17-18: 1 hdc in each st around.
- Adult Only, Round 19: *Hdc2tog, 1 hdc in next hdc; rep from * around. 12 sts. (12)
- Both Sizes, Next Round: 1 hdc in each st around.
- Both Sizes, Following Round: Hdc2tog 6 times. 6 sts. (6)
- Step 1: Fasten off, leaving a long tail. Thread the tail through the remaining stitches and pull tightly to close the top.
Inner Hat
Use the smaller hook and A.
- Step 1: Ch 4. Join with sl st to first ch to form a ring.
- Round 1: Ch 2. Work 6 hdc in ring. PM on first hdc. 6 hdc. (6)
- Round 2: 2 hdc in each hdc around. 12 hdc. (12)
- Round 3: Work as for Round 2. 24 hdc. (24)
- Round 4: *2 hdc in next hdc, 1 hdc in next hdc; rep from * around. 36 hdc. (36)
- Round 5: 1 hdc in each hdc around.
- Round 6: *2 hdc in next hdc, 1 hdc in each of next 2 hdc; rep from * around. 48 hdc. (48)
- Adult Only, Round 7: *2 hdc in next hdc, 1 hdc in each of next 11 hdc; rep from * around. 52 hdc. (52)
- Both Sizes, Next Round: 1 hdc in each hdc around.
- Rounds 8 onward (Child) / 9 onward (Adult): Rep the previous round until the hat measures approx 7 (8) in. [18 (20.5) cm] from crown to bottom when laid flat. Do not fasten off.
Join Head and Inner Hat
- Step 1: Place the Inner Hat inside the Head with WS together, aligning stitches with the remaining loops of the foundation chain.
- Round 1: Ch 1. Working through both thicknesses, work 1 sc in each hdc around. Join with sl st to first st at the end of the round. Fasten off.
Right Fin
Use the smaller hook and A.
- Step 1: Ch 9.
- Row 1: 1 sc in 2nd ch from hook. 1 sc in each ch to end. Turn. 8 sc. (8)
RS.
- Row 2: Ch 1. Sc2tog. 1 sc in each sc to end. Turn. 7 sts. (7)
- Row 3: Ch 1. 1 sc in each st to end. Turn.
- Rows 4-13: Rep Rows 2-3 5 more times. 2 sts at end of Row 13. (2)
- Row 14: Ch 1. Sc2tog. Turn. 1 st. (1)
- Row 15: Ch 1. 1 sc in st. Working along shaped side edge, work 1 sc in side of each row to bottom corner. Work (1 sc, ch 2, 1 sc) in corner. Work 1 sc in each remaining loop of foundation ch. Fasten off, leaving a long tail.
Left Fin
Use the smaller hook and A.
- Step 1: Ch 9.
- Row 1: 1 sc in 2nd ch from hook. 1 sc in each ch to end. Turn. 8 sc. (8)
RS.
- Row 2: Ch 1. 1 sc in each sc to last 2 sc. Sc2tog. Turn. 7 sts. (7)
- Row 3: Ch 1. 1 sc in each st to end. Turn.
- Rows 4-13: Rep Rows 2-3 5 more times. 2 sts at end of Row 13. (2)
- Row 14: Ch 1. Sc2tog. Turn. 1 st. (1)
- Row 15: Ch 1. 1 sc in st. Fasten off.
- Step 2: With RS facing, join A with sl st to remaining loop of first ch of foundation chain. Ch 1. Work 1 sc in each remaining loop of foundation ch to last ch. Work (1 sc, ch 2, 1 sc) in last ch. Working up shaped side, work 1 sc in side of each row to top. Work 1 sc in last sc. Fasten off, leaving a long tail.
Edging.
Attach Fins
- Step 1: Sew the Fins to the sides of the Head, with their top edges meeting at the point at the top.
Eyes
Make 2 with the smaller hook and B.
- Step 1: Ch 5.
- Round 1: 1 sc in 2nd ch from hook, 1 sc in each of next 2 ch, 3 sc in last ch. Do not turn. Working in remaining loops of foundation ch, work 1 sc in each of next 2 ch and 2 sc in last ch. Join with sl st to first sc. 10 sc. (10)
- Round 2: Ch 1. Work 2 sc in first sc, 1 sc in each of next 2 sc, 2 sc in each of next 3 sc, 1 sc in each of next 2 sc, and 2 sc in each of last 2 sc. Join with sl st to first sc.
- Round 3: Ch 1. 1 sc in each sc around. Join with sl st to first sc. Fasten off, leaving a long tail.
- Step 2: With black worsted weight yarn, embroider pupils using Satin Stitch in the center of each Eye.
Pupils.
- Step 3: Sew the Eyes to the front of the Hat, stuffing lightly with fiberfill as you stitch.
Tentacles
Make 2 with the larger hook and A.
- Step 1: Lay the Head flat and PM at each side edge along the bottom.
- Row 1: Join A to a marked st. Ch 36. Sl st in 2nd ch from hook, 1 sc in next ch, 1 hdc in each of next 2 ch, 1 dc in each of next 3 ch, 1 hdc in each of next 2 ch, 1 sc in next ch, and sl st in each of next 25 ch to top. Sl st in same sp as beginning sl st. Ch 1. Working in remaining loops of ch, work sl st in each of next 25 ch, 1 sc in next ch, 1 hdc in each of next 2 ch, 1 dc in each of next 3 ch, 1 hdc in each of next 2 ch, 1 sc in next ch, and sl st in last ch. Fasten off.
RS.
- Step 2: Rep Row 1 for the second Tentacle at the opposite marked st.
Cape
Use the larger hook and A.
- Step 1: Ch 38 (46).
- Row 1: 1 hdc in 3rd ch from hook. 1 hdc in each ch to end. Turn. 36 (44) hdc.
RS.
- Row 2: Ch 1. Work 1 hdc in first hdc, 1 hdc in next hdc, ch 2, skip next 2 hdc for the buttonhole, and 1 hdc in each hdc to end of row. Turn.
- Row 3: Ch 1. Work 2 hdc in first hdc, *1 hdc in each of next 4 (5) hdc, 2 hdc in next hdc; rep from * 5 more times. Work 1 hdc in each of next 1 (3) hdc, 2 hdc in ch-2 sp, 1 hdc in next hdc, and 2 hdc in last hdc. Turn. 44 (52) hdc.
- Row 4: Ch 1. 1 hdc in each hdc to end. Turn.
- Row 5: Ch 1. Work 2 hdc in first hdc, 1 hdc in each hdc to last hdc, and 2 (1) hdc in last hdc. 46 (53) hdc.
Arms
The Arms are worked one at a time while staying attached to the last Cape row, so keep the Cape untwisted as you turn each Arm. Make 8 directly from the last row of the Cape.
- Row 1: Ch 1. Work 1 sc in first hdc.
- Step 1: *Ch 25 (33). Work 2 sc in 2nd ch from hook and 1 sc in each of next 23 (31) ch. Sl st in next hdc of the last row of the Cape. Turn. 25 (33) sc.
- Row 2: Ch 1. 1 sc in each sc to last sc. Work 2 sc in last sc. Turn. 26 (34) sc.
- Row 3: Ch 1. 1 sc in each sc to end of row. Sl st in next hdc of the last row of the Cape. Turn.
- Row 4: Ch 1. 1 sc in each sc to last 2 sc. Sc2tog. Turn. 25 (33) sts.
- Row 5: Ch 1. Sc2tog. 1 sc in each sc to end of row. Sl st in next hdc of the last row of the Cape.
- Step 2: Work 1 sc in each of next 3 (4) hdc. Rep from * through Step 2 6 more times, then rep from * through the sl st attachment at the end of Row 5 once more, omitting the final 1 sc in each of next 3 (4) hdc. Fasten off. 8 Arms made.
Suckers
Make 8 with the larger hook and B.
- Step 1: Ch 25 (33).
- Row 1: 2 sc in 2nd ch from hook. 1 sc in each ch to end. Turn. 25 (33) sc.
WS.
- Row 2: Ch 1. 1 sc in each sc to last sc. Work 2 sc in last sc. Turn. 26 (34) sc.
- Row 3: Ch 1. Work 1 sc in each of first 4 sc. *Bobble in next st, 1 sc in each of next 3 sc; rep from * to last 2 sc. Work 1 sc in each of last 2 sc. Turn.
- Row 4: Ch 1. 1 sc in each st to last 2 sc. Sc2tog. Turn. 25 (33) sts.
- Row 5: Ch 1. Sc2tog. 1 sc in each sc to end of row. Fasten off, leaving a tail approx 5 in. [12.5 cm] long.
Join Suckers to Arms and Finish Cape
Pair each Sucker with an Arm before joining so the pieces stay aligned and none are missed.
- Step 1: *With WS of Arm and Sucker aligned and RS of Arm facing up, use the larger hook to join A with sl st to first ch of Arm and last sc of Sucker. Working through both thicknesses, work 1 sc in each st around Arm, working (1 sc, ch 2, 1 sc) in the tip. Work 1 sc in each of next 3 (4) sc of Cape; rep from * for the remaining Arms, ending with a sl st in last sc of Cape after the last Arm and Sucker join. Fasten off.
- Step 2: Using the B yarn tails from the Suckers, whipstitch along the straight top edge of each Sucker to close it, sewing carefully through the front loops of the Cape so the stitches remain hidden on the RS.
- Step 3: Sew the button onto the Cape edge, aligned with the buttonhole.
My Best Tips
- Mark the spiral clearly: Move your marker into the first stitch of every Head and Inner Hat round. Because these rounds aren't joined, the marker is the easiest way to keep the decrease placement and measurements accurate.
- Check both gauges: Make a separate gauge check for the smaller and larger hooks. The Hat uses hdc with the smaller hook, while the larger hook's sc gauge affects the Arms and Suckers.
- Keep the eye stuffing light: Add small bits of fiberfill as you sew each Eye in place. Firm stuffing can make the edge harder to attach and may pull the Hat fabric out of shape.
- Pair the long pieces first: Lay out all eight Arms and Suckers before joining. Match their starting edges and tips, then secure each pair through both thicknesses.
Ways to Adapt Your Squid Costume
- Changing the main yarn: Another Super Bulky (6) yarn can work, but check the listed hdc and sc gauges. A yarn that meets one gauge but not the other may fit the Hat correctly while changing the Cape and Arm dimensions.
- Using a different eye yarn: You can substitute another yarn for B if it works comfortably with the listed hooks. A thinner yarn will make a lighter, less substantial Eye or Sucker strip, while a thicker yarn can make joining through both layers harder.
- Adjusting hat depth: The straight rounds before the Head decreases control its upper depth, while the Inner Hat is worked to its own crown-to-bottom measurement. Check both pieces against the wearer before joining because that seam locks in the finished depth.
- Changing the button: A slightly different button may work if it passes through the ch-2 opening and stays closed during wear. Avoid enlarging the buttonhole unless you've tested the neckline, since that opening is built into Row 2.
- Using less eye stuffing: The Eyes may be left nearly flat or stuffed very lightly. More fiberfill adds firmness, but it also increases the strain on the sewing stitches and the Hat fabric beneath them.
Fixing Fit and Assembly Snags
- The Head and Inner Hat don't line up: Check that you're joining the correct size and that the Adult increase round wasn't added to the Child Inner Hat. If the stitch counts are correct, distribute the layers evenly with several markers before working the joining round.
- The Arm edges twist: Return to the Cape attachment point after every Arm row exactly as instructed. Turning in the wrong direction or missing a sl st into the Cape can rotate the strip and shift the next attachment point.
- The Sucker strip sits unevenly: Align the WS of the Arm and Sucker before starting the joining edge, then pin or mark the tip and both ends. The sc edging can only enclose the pair evenly when their shaped ends remain matched.
Washing & Care
The fiber content isn't specified, so follow the washing instructions on your yarn labels. Because the costume includes stuffing, embroidery, long joined Arms, and a sewn button, gentle hand washing and flat drying are the safest choices. Reshape the pieces while damp and let the Eyes dry completely before storing.
More Crochet Costume Hats and Headbands
- Knitted Dinosaur Hat
- Halloween Crochet Kitty Hat
- Spooky Crochet Spider Hat
- Crochet Curved Horn Headband
Frequently Asked Questions
Why are there two hat layers?
The outer Head carries the fins, eyes, and tentacles, while the Inner Hat forms the fitted layer against the wearer. They're crocheted separately and joined through both thicknesses at the lower edge, which also closes the foundation area neatly.
When should I check the hat depth?
Check it before joining the Inner Hat to the Head. The Head is measured before its decrease rounds, and the Inner Hat is worked to 7 (8) in. [18 (20.5) cm] from crown to bottom when laid flat. Once the layers are joined, changing their depth becomes much harder.
How many Arms and Suckers do I need?
You need 8 Arms and 8 Suckers. Each Sucker is paired with one Arm, and the pair is edged together through both thicknesses before the joining path continues across the Cape to the next Arm.
Do I join the Head rounds?
No, the Head and Inner Hat are worked in continuous spirals. Move the marker into the first stitch of every round so the decreases and increases stay correctly placed. The lower joining round is different and is closed with a sl st.
Why are two hook sizes used?
The 6.5 mm hook controls the Hat, Fins, and Eyes, while the 8 mm hook is used for the Tentacles, Cape, Arms, and Suckers. The two gauges support different parts of the construction, so changing one hook can alter fit or the way paired pieces align.
Enjoy the moment you fasten the cape and settle the finished squid hat into place for its first costume outing. If you make it, leave a comment and tell me how it went.



