
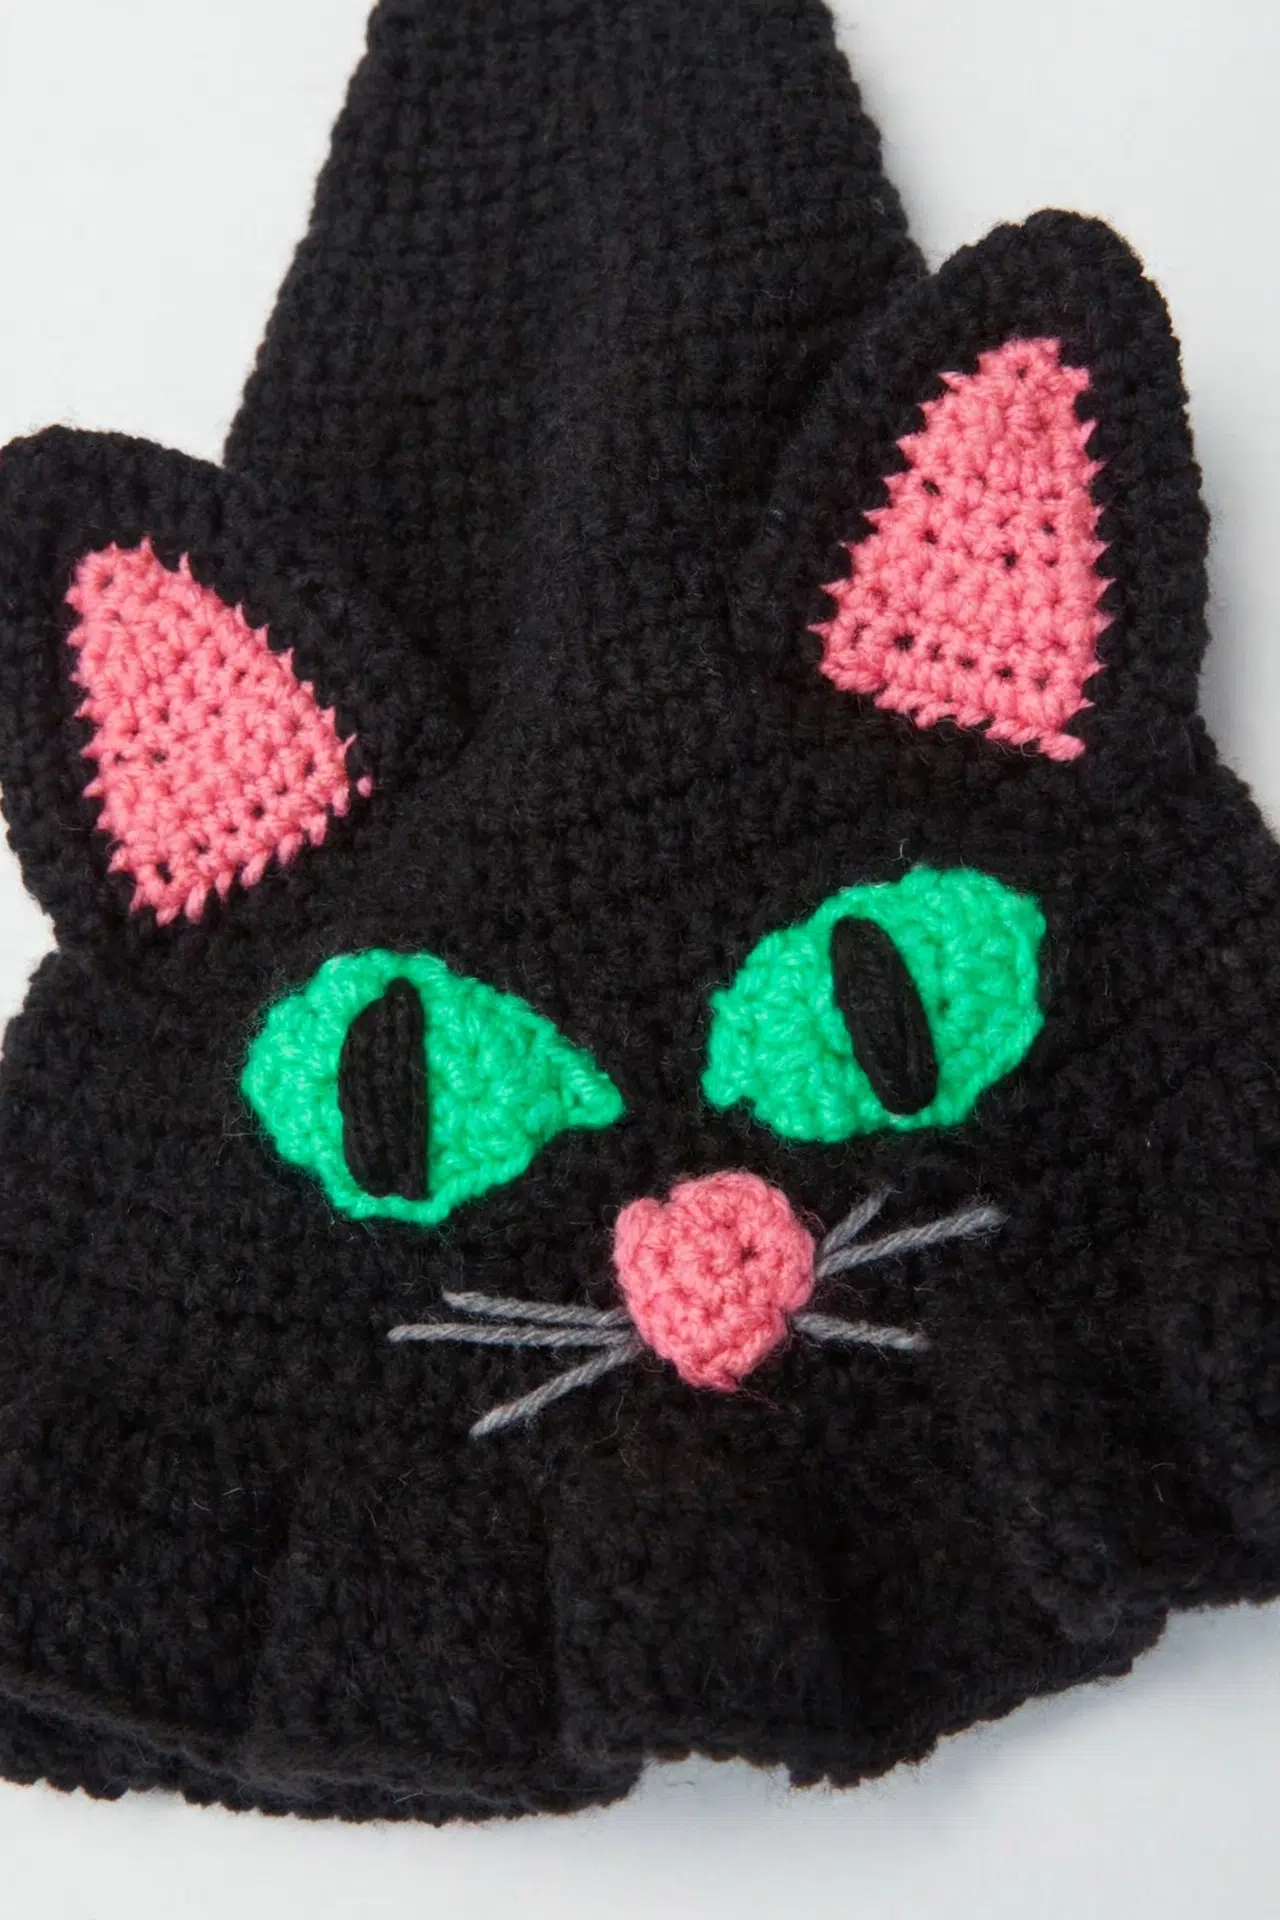
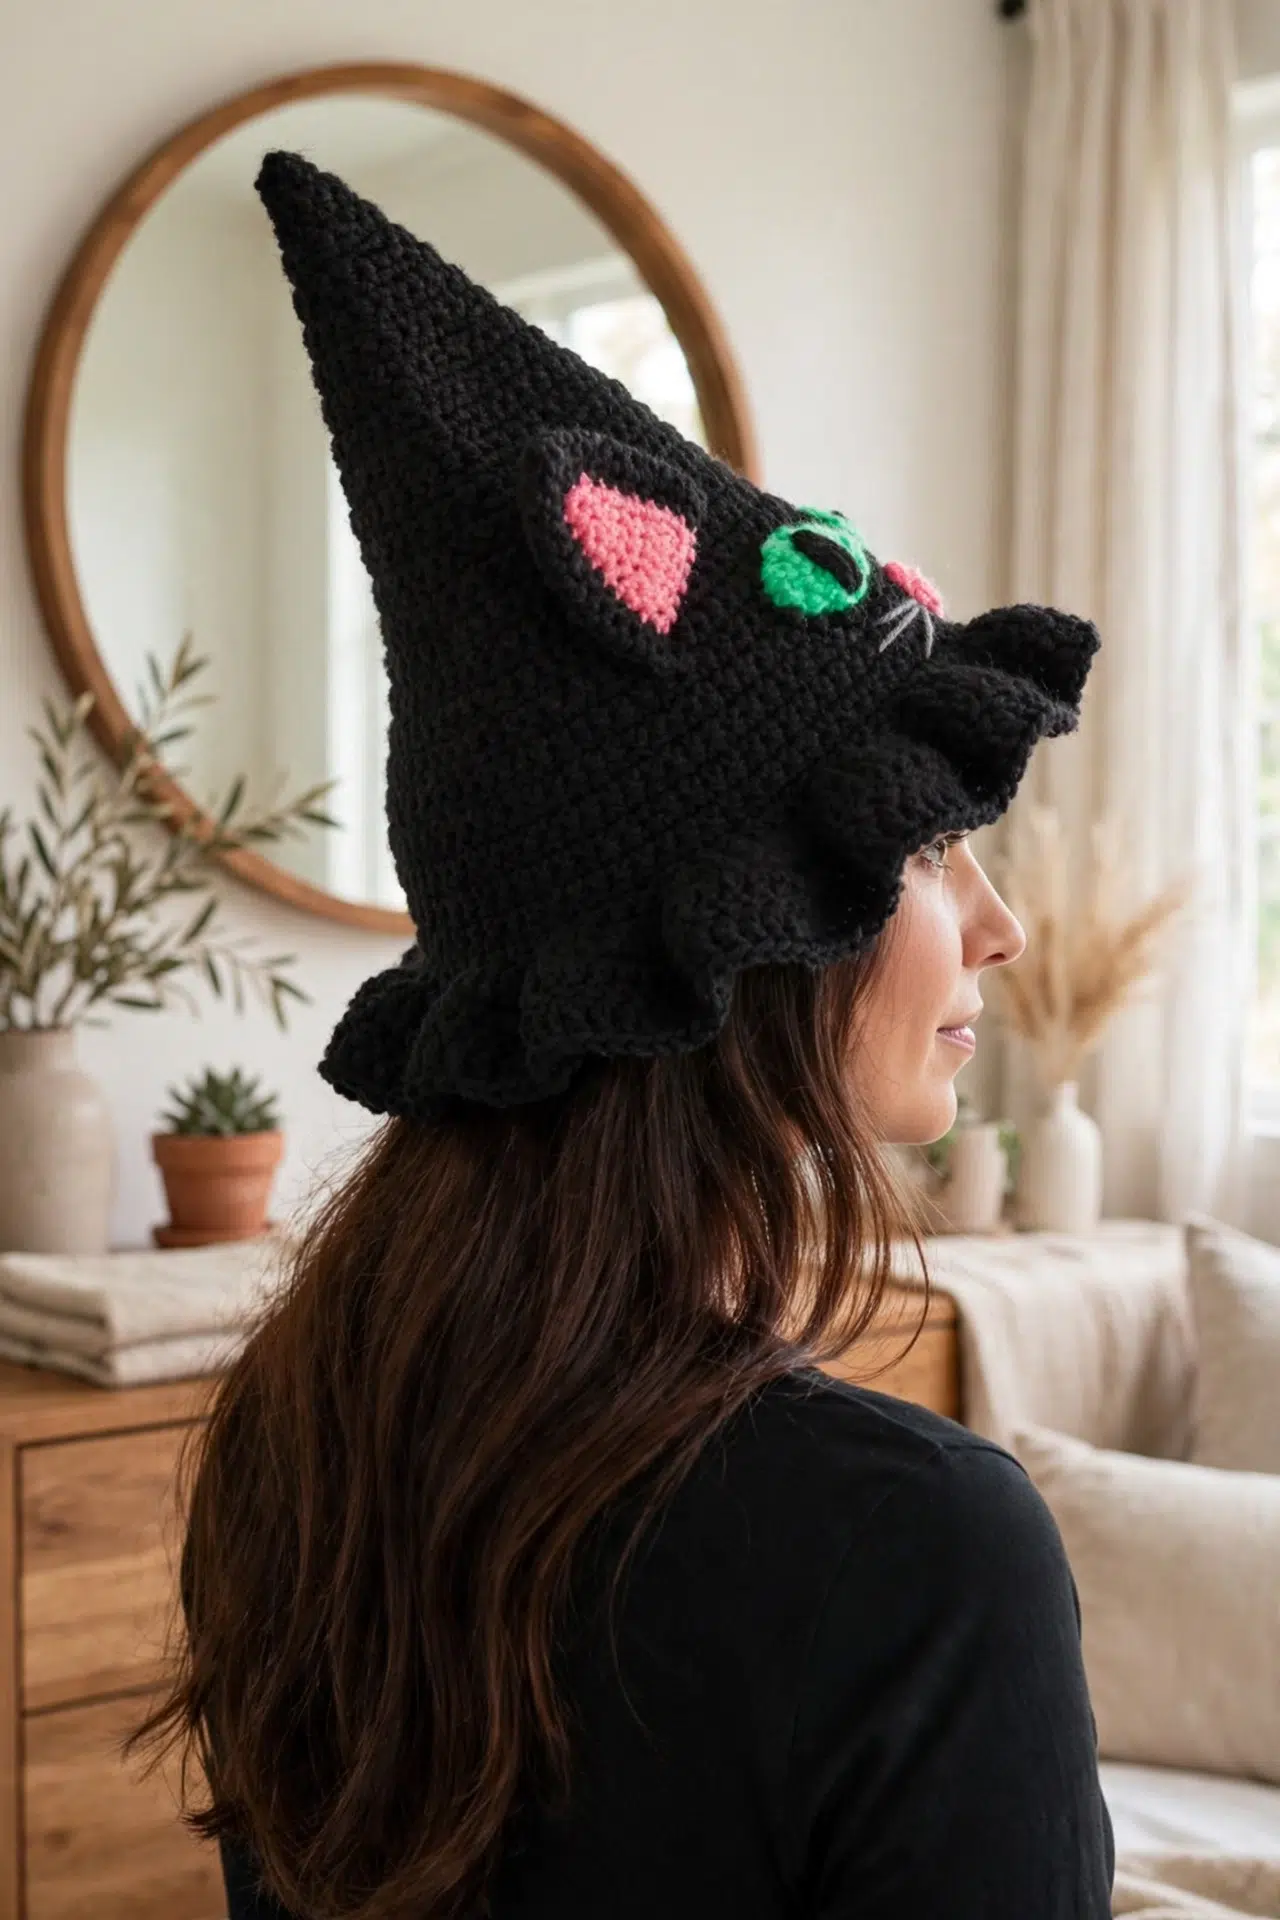
There’s a playful mix of cozy crochet and costume detail in this Halloween Crochet Kitty Hat, and the easy skill level makes it welcoming for newer crocheters as well as experienced hands wanting a relaxed project. You’ll build the hat in simple rows, then add separate ears, eyes, a nose, and embroidered details.

I especially love that the shaping comes from evenly spaced increase rows rather than complicated construction. Choose the size that fits your wearer, switch the assigned colors if you’d like, and take your time arranging the appliques before you sew. Ready to make yours!
Jump to:
Why I Love This Pattern
- Straightforward shaping: The hat grows through regular single crochet increase rows, with several plain rows between them. That rhythm gives your hands a comfortable break from constant counting.
- Four useful sizes: Instructions cover head measurements from 16 in. through 22 in. [40.5 cm through 56 cm], so you can make the hat for a wide range of wearers.
- Manageable finishing: Long tails are left where you need them for seaming and attaching pieces. The embroidery uses satin stitch, chain stitch, and simple long stitches.
- Easy-to-adjust brim: The brim is made with double crochet after the main hat body, so its depth is simple to change by adding or removing a plain brim row.
Pattern Details
- Skill Level: Easy
- Finished Size: Fits a 16 in. (18 in., 20 in., 22 in.) [40.5 cm (45.5 cm, 51 cm, 56 cm)] head.
- Gauge: 8 sts = 2.5 in. [6.5 cm]; 8 rows = 2 in. [5 cm]. Use any size hook needed to obtain gauge.
- Yarn Weight: Medium 4
- Time to Make: about 7-10 hours
What You'll Need
Gather your Medium 4 yarn, hook, marker, and yarn needle before you begin so each small piece is easy to finish as you go.
- RED HEART Super Saver, Color A: 1 skein 312 Black
- RED HEART Super Saver, Color B: 1 skein 706 Perfect Pink
- RED HEART Super Saver, Color C: 1 skein 3620 Glowworm
- RED HEART Super Saver, Color D: 1 skein 400 Grey Heather
- RED HEART Super Saver solid colors: 7 oz [198 g], 364 yds [333 m] per skein; stripes, prints, multis, and heathers: 5 oz [141 g], 236 yds [215 m] per skein; flecks: 5 oz [141 g], 260 yds [238 m] per skein: You’ll only use small quantities of these colors, even though the materials list gives one skein of each.
- 5.5 mm [US I-9] crochet hook: Treat this as a starting size. The finished fit depends on gauge, so change hooks if your swatch doesn’t match.
- Yarn needle
- Stitch marker
Stitches & Abbreviations
- A, B, C, etc. - Color A, Color B, Color C, etc.
- ch - chain(s)
- dc - double crochet
- hdc - half double crochet
- sc - single crochet
- sl st - slip stitch
- sp - space(s)
- st(s) - stitch(es)
- ( ) - work directions in parentheses into the same st
- [ ] - work directions in brackets the number of times specified
- * - repeat the directions following the asterisk as indicated
sc2tog: Insert hook in next stitch, yarn over and pull up a loop 2 times, yarn over and draw through all 3 loops on hook.
sc3tog: Insert hook in next stitch, yarn over and pull up a loop 3 times, yarn over and draw through all 4 loops on hook.
Join with sc: Place a slip knot on hook, insert hook in indicated stitch, yarn over and pull up a loop, yarn over and draw through both loops on hook.
How to Crochet the Halloween Kitty Hat
Choose your size before starting and follow only the size-specific rows that apply to it.
Directions are for size Small. Numbers read Small (Medium, Large, Extra Large). Only small quantities of B, C, and D are needed. Check your gauge and change hook size if necessary. The hat is worked flat in rows and seamed at the back. The eye begins in continuous rounds. Place a marker at the beginning of the round and move it up as each round is completed. Placement of the ears, eyes, and nose depends on the project photograph.
Hat
- Row 1: With A, ch 2. Work 6 sc in 2nd ch from hook, turn. (6)
- Row 2: Ch 1, sc in each sc across, turn.
- Row 3: Repeat Row 2.
- Row 4: Ch 1, 2 sc in each sc across, turn. (12)
- Rows 5-7: Repeat Row 2.
- Row 8: Ch 1, *sc in next sc, 2 sc in next sc; rep from * across, turn. (18)
- Rows 9-11: Repeat Row 2.
- Row 12: Ch 1, *2 sc in next sc, sc in next 2 sc; rep from * across, turn. (24)
- Rows 13-15: Repeat Row 2.
- Row 16: Ch 1, *sc in next 3 sc, 2 sc in next sc; rep from * across, turn. (30)
- Rows 17-19: Repeat Row 2.
- Row 20: Ch 1, *2 sc in next sc, sc in next 4 sc; rep from * across, turn. (36)
- Rows 21-23: Repeat Row 2.
- Row 24: Ch 1, *sc in next 5 sc, 2 sc in next sc; rep from * across, turn. (42)
- Rows 25-27: Repeat Row 2.
- Row 28: Ch 1, *2 sc in next sc, sc in next 6 sc; rep from * across, turn. (48)
- Rows 29-31: Repeat Row 2.
- Row 32: Ch 1, *sc in next 7 sc, 2 sc in next sc; rep from * across, turn. (54)
Sizes Medium, Large, and Extra Large only.
- Rows 33-35: Repeat Row 2.
Sizes Medium, Large, and Extra Large only.
- Row 36: Ch 1, *2 sc in next sc, sc in next 8 sc; rep from * across, turn. (60)
Sizes Medium, Large, and Extra Large only.
- Rows 37-39: Repeat Row 2.
Sizes Medium, Large, and Extra Large only.
- Row 40: Ch 1, *sc in next 9 sc, 2 sc in next sc; rep from * across, turn. (66)
Sizes Large and Extra Large only.
- Rows 41-43: Ch 1, sc in each sc across, turn.
Sizes Large and Extra Large only.
- Row 44: Ch 1, *2 sc in next sc, sc in next 10 sc; rep from * across, turn. (72)
Sizes Large and Extra Large only.
- Rows 45-47: Repeat Row 2.
Sizes Large and Extra Large only.
- Row 32 (Rows 40-41, Rows 48-49): Repeat Row 2.
Sizes Small, Medium, and Large only.
- Row 48: Ch 1, *sc in next 11 sc, 2 sc in next sc; rep from * across, turn. (78)
Size Extra Large only.
- Rows 49-51: Ch 1, sc in each sc across, turn.
Size Extra Large only.
Brim
- Row 33 (42, 50, 52): Ch 3, which counts as the first dc here and throughout, working in back loops only, dc in first sc, 2 dc in each remaining sc across, turn.
96 (120, 144, 156) dc.
- Rows 34-35 (43-44, 51-52, 53-54): Ch 3, dc in each dc across, turn. Fasten off, leaving a long tail for sewing.
Ear Front
Make 2 ear fronts.
- Row 1: With B, ch 6 (6, 7, 7). Sc in 2nd ch from hook and in each remaining ch, turn.
Right side. 5 (5, 6, 6) sc.
- Row 2: Ch 1, sc in each sc across, turn.
- Row 3: Ch 1, sc2tog, sc in each st across to last 2 sts, sc2tog, turn.
3 (3, 4, 4) sc.
- Rows 4-5 (4-5, 4-6, 4-6): Repeat Row 2.
- Row 6: Ch 1, sc3tog, turn. (1)
Sizes Small and Medium only.
- Row 7: Ch 1, (sc2tog) 2 times, turn. (2)
Sizes Large and Extra Large only.
- Row 8: Ch 1, sc2tog, turn. (1)
Sizes Large and Extra Large only.
- Round 7 (7, 9, 9): Ch 1, 3 sc in sc; work 5 (5, 7, 7) sc evenly spaced across ends of rows; working in opposite side of foundation ch, 3 sc in first ch, sc in each ch across to last ch, 3 sc in last ch; work 5 (5, 7, 7) sc evenly spaced across ends of rows; join with sl st in first sc. Fasten off.
13 (13, 18, 18) sc and three 3-sc groups.
- Row 8 (8, 10, 10): With right side of bottom edge facing, join A with sc in center st of last 3-sc group, sc in each sc across side edge to next 3-sc group, sc in first st of next 3-sc group, 3 sc in center st of same group, sc in each sc across side edge to next 3-sc group, sc in first 2 sts of next 3-sc group; leave remaining sts unworked, turn.
16 (16, 20, 20) sc and one 3-sc group.
- Row 9 (9, 11, 11): Ch 1, sc in each st across to center st of 3-sc group, 3 sc in center st, sc in each remaining st. Fasten off, leaving a long tail for sewing.
Ear Back
Make 2 ear backs.
- Step 1: With A, repeat the Ear Front.
Nose
- Round 1: With B, ch 2. Work 6 sc in 2nd ch from hook; join with sl st in first sc. Fasten off, leaving a long tail for sewing. (6)
Eye
Make 2 eyes.
- Round 1: With C, ch 2. Work 6 sc in 2nd ch from hook. Do not join. Place marker for beginning of round and move marker up as each round is completed. (6)
- Round 2: *Sc in next sc, 2 sc in next sc; rep from * around. (9)
Sizes Small and Medium only.
- Round 3: (2 hdc, ch 1, 2 hdc) in next sc, sc in next 4 sc, (2 hdc, ch 1, 2 hdc) in next sc; join with sl st in first hdc. Fasten off, leaving a long tail for sewing.
Sizes Small and Medium only.
- Round 2: Work 2 sc in each sc around. (12)
Sizes Large and Extra Large only.
- Round 3: (Hdc, dc, ch 2, sl st in 2nd ch from hook, dc, hdc) in next sc, sc in next 5 sc, (hdc, dc, ch 2, sl st in 2nd ch from hook, dc, hdc) in next sc; join with sl st in first hdc. Fasten off, leaving a long tail for sewing.
Sizes Large and Extra Large only.
Finishing
Pin every applique in place before sewing so you can check its position against the photograph and make small adjustments. Use the project photograph as a guide for placing the pieces.
- Step 1: With the end tail, seam the back of the hat through the ends of the rows.
- Step 2: With wrong sides of each ear front and back held together, sew around the outer edges. Sew the bottom edge securely in place through all layers. Sew 2-3 sts at the midpoint of the back of each ear to the hat to prevent the ear from falling forward.
- Step 3: With A, embroider a satin stitch pupil in the center of each eye. Pin the eyes to the hat and sew them in place. With A, embroider chain stitches around each eye.
- Step 4: Center the nose under the eyes and sew it in place. With D, embroider whiskers using long stitches on each side of the nose.
- Step 5: Weave in ends.
My Best Tips
- Mark your size: Highlight the first number or the correct parenthetical number throughout the pattern before you begin. This is especially helpful where each size reaches the brim on a different row.
- Count increase rows: Pause after every increase row and confirm the stated stitch count. An extra or missed increase changes both the fit and the brim count later.
- Keep row ends relaxed: Avoid tightening the turning chain or final stitch of each row. Those row ends become the back seam, and even tension helps the edges meet neatly.
- Pin before sewing: Use several pins around the eyes, nose, and ears rather than holding each piece with one pin. The extra support keeps an applique from shifting while you stitch around it.
Ways to Adapt Your Kitty Hat
- Change the main color: You can replace Color A with another shade of the same yarn. Keep the yarn weight and gauge unchanged so the size and brim counts still work.
- Use small leftovers for details: Colors B, C, and D require only small quantities, so matching Medium 4 leftovers can work. Differences in fiber or thickness may make an applique firmer or softer than the hat.
- Adjust the brim depth: Remove one plain double crochet row for a shorter brim or repeat the final brim row for more depth. This changes length without changing the hat circumference.
- Choose another hook size: A different hook is appropriate when it gives you the listed gauge. Don’t change hooks merely to alter the hat size because the pattern already provides four measured sizes.
- Simplify the embroidery: You can omit the chain stitches around the eyes, but keep the pupils and whiskers if you want all of the facial details included in the pattern.
Fixing Hat and Applique Problems
- The brim count doesn’t match: Check the stitch count at the final single crochet row first. In the brim setup, the turning chain and the double crochet in the first stitch create 2 stitches there, and every remaining single crochet receives 2 double crochets.
- The back seam ripples: Your row ends may have uneven tension or the seam may be pulled too tightly. Match the rows one by one and sew with enough slack for the seam to lie naturally.
- An ear tips forward: Add the instructed 2-3 stitches between the midpoint of the ear back and the hat. Those anchoring stitches support the ear above its sewn bottom edge.
Caring for Your Hat
Follow the care directions on the yarn label, especially if you substitute a different fiber. Secure the appliques and embroidery before cleaning, and avoid anything that could snag the long whisker stitches. Reshape the brim and ears while the hat dries.
More Halloween Crochet Patterns
- Spooky Crochet Spider Hat
- Crochet Curved Horn Headband
- Mini Crochet Halloween Cat
- Black Cat Amigurumi Crochet Pattern
Frequently Asked Questions
Why is the hat worked flat instead of in rounds?
The flat construction creates the shaped hat body with simple back-and-forth rows. Regular increase rows widen the piece, while the final long tail closes the row ends into the back seam. It also means you don’t need to manage joined rounds while forming the main hat.
How do I know which row begins the brim for my size?
Begin the brim at Row 33 (42, 50, 52) for Small (Medium, Large, Extra Large). Each size completes a different number of body rows before reaching its required stitch count, which is why the brim row number changes even though the brim instructions are otherwise shared.
Can I skip checking gauge and choose by head measurement alone?
No, the listed head measurements depend on matching 8 stitches over 2.5 in. [6.5 cm] and 8 rows over 2 in. [5 cm]. A tighter gauge makes the hat smaller and a looser gauge makes it larger, while the fixed row counts also affect its height.
When should I sew the facial pieces in place?
Sew them on after closing the back seam and assembling the ears. Pin the eyes first, center the nose beneath them, and compare the arrangement with the photograph before stitching. That order gives you room to adjust the spacing before any piece becomes permanent.
Share how your kitty hat turned out in the comments because I’d love to hear about your make! 🧶



