
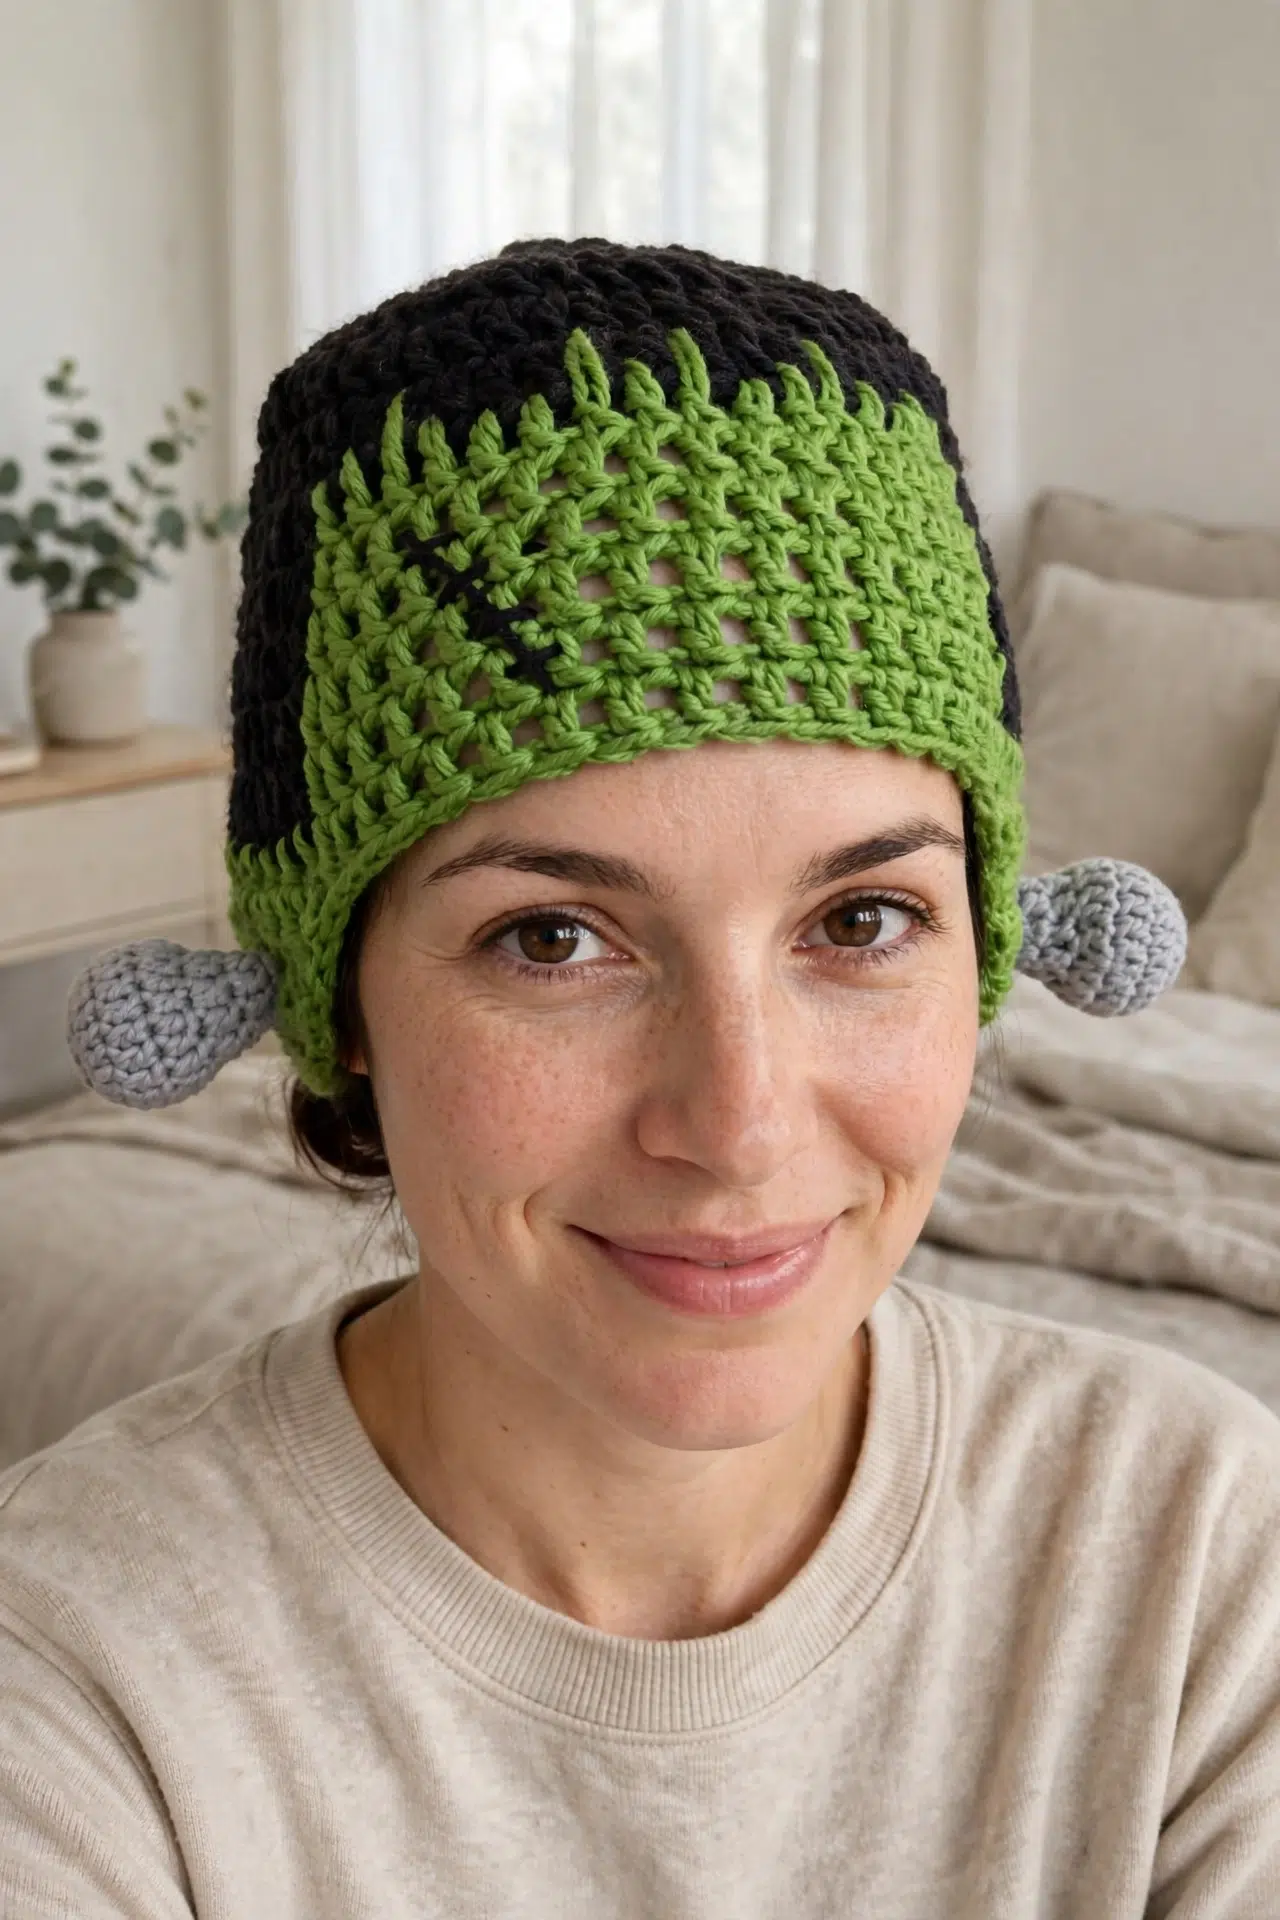
You get a costume piece that's enjoyable to crochet and useful well beyond a single photo with this Halloween Monster Crochet Beanie. It keeps a child's head covered while trick-or-treating, works for a costume party, and can head straight into the dress-up box afterward.

The main hat grows through simple dc increases, then settles into steady rounds before the color changes and shaped ear flaps keep your hands interested. A smaller hook and lighter yarn make the bolts, so there's a satisfying change of pace without a completely new construction method.
Jump to:
Why I Love This Pattern
- Steady crown shaping: The first five rounds increase in a clear pattern until you reach 50 sts. Once the crown is established, several even rounds let you settle into a comfortable rhythm.
- Creative texture without extra stitches: Round 7 invites you to change where the hook enters while preserving the stitch count. You get room to play without rewriting the round or managing complicated shaping.
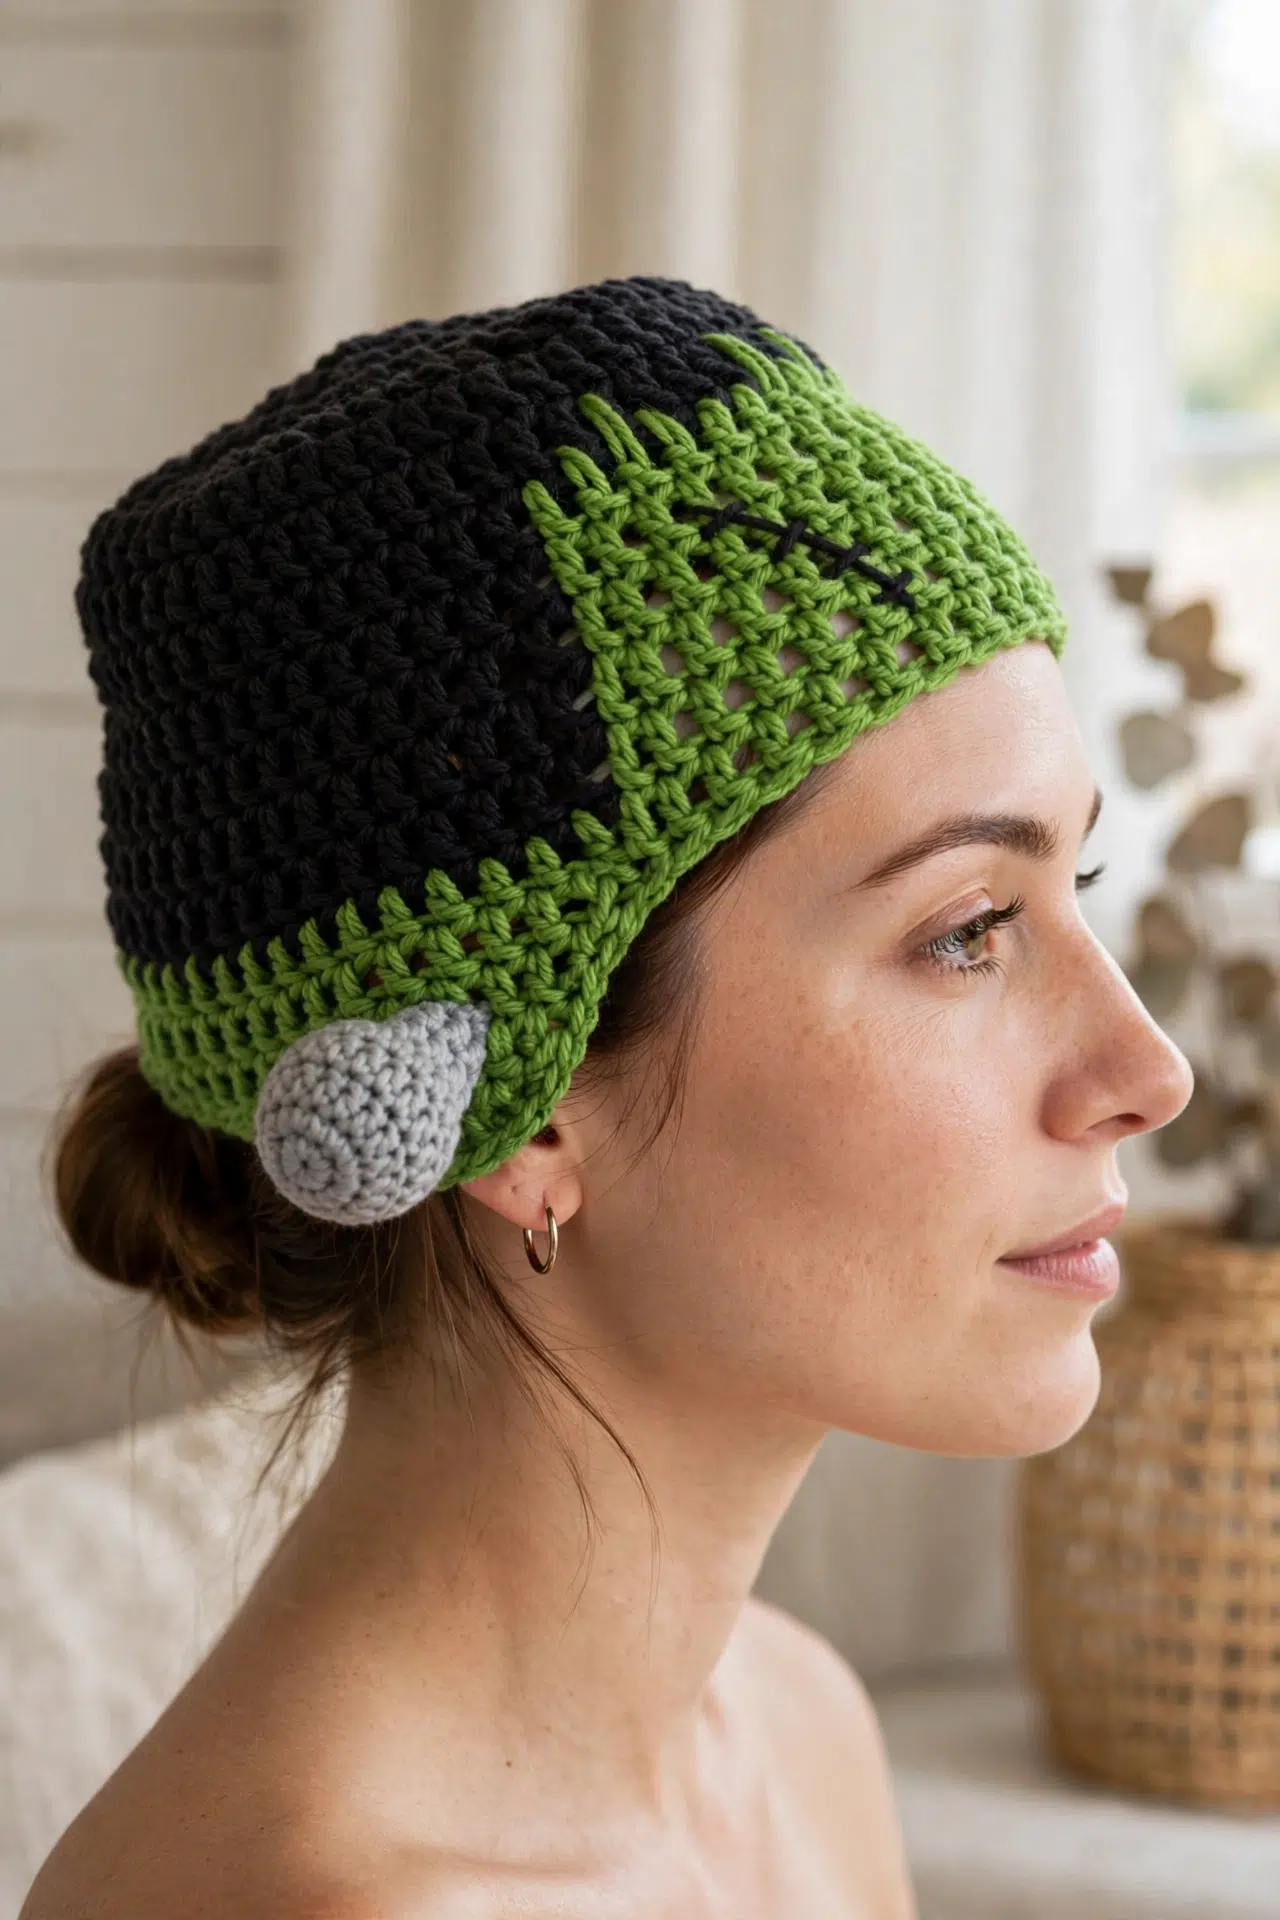
- Built-in costume details: The ear flaps are formed directly from the final beanie round, while the scar and stuffed bolts are added afterward. That construction keeps the decorative work manageable.
- Two useful yarn scales: Super bulky yarn carries the main beanie quickly, while DK or light worsted yarn keeps the smaller bolt rounds easier to control.
Pattern Details
- Skill Level: Intermediate
- Finished Size: Fits ages 3-10 years.
- Yarn Weight: Super Chunky / Super Bulky for the beanie; DK / light worsted for the bolts
- Time to Make: about 5-7 hours
Materials for This Beanie
Gather both hook sizes before you begin, since the beanie and bolts use different yarn weights. You'll also want your yarn needle ready for the scar, tails, and final assembly.
- Super Bulky/Super Chunky yarn in black and green: Choose yarn that feels comfortable against the head. A major change in fiber, loft, or twist can alter the fit even when the label lists the same weight.
- DK/light worsted weight yarn in grey
- 6 mm crochet hook
- 3 mm crochet hook or similar
- Yarn needle
- Scissors
- Stuffing for the bolts: Only a small amount is needed. Add it gradually so the bolts hold their shape without becoming too firm to sew securely.
Abbreviations
- ch - chain
- dc - double crochet
- dc2tog - double crochet 2 stitches together
- ea - each
- rep - repeat
- sl st - slip stitch
- st - stitch
- sts - stitches
How to Crochet the Halloween Monster Beanie
Work the beanie first, add the sewn scar, then crochet, stuff, and attach the bolts.
Ch 2 counts as a dc here and throughout. Maintain 50 sts while varying the insertion points in the green section of Round 7 to create the jagged edge. Join each new color in the final stage of the previous st so the next st begins in the new color.
Beanie
- Round 1: Using black yarn and a 6 mm crochet hook, ch 5, sl st in first ch to form a loop, work 10 dc in the ch-5 loop, and sl st in first dc to join. (10)
- Round 2: Ch 2, 1 dc in same st as previous sl st, 2 dc in each remaining st around, and sl st in top of ch 2 to join. (20)
- Round 3: Ch 2, 2 dc in next st, *1 dc in next st, 2 dc in next st; rep from * around. Sl st in top of ch 2 to join. (30)
- Round 4: Ch 2, 1 dc in next st, 2 dc in next st, *1 dc in next 2 sts, 2 dc in next st; rep from * around. Sl st in top of ch 2 to join. (40)
- Round 5: Ch 2, 1 dc in next 2 sts, 2 dc in next st, *1 dc in next 3 sts, 2 dc in next st; rep from * around. Sl st in top of ch 2 to join. (50)
- Round 6: Ch 2, 1 dc in each st around, and sl st in top of ch 2 to join. (50)
- Round 7: Ch 2, 1 dc in next 16 sts, joining green yarn in the end of the last st. Work 1 dc in next 16 sts in green, creating a jagged edge by crocheting into the sts at the top as normal, the gaps below, or even the previous sts. Join black again in the end of the last st, work 1 dc in last 17 sts in black, and sl st in top of ch 2 to join. (50)
Change the insertion point without adding or skipping sts.
- Rounds 8-11: Ch 2, 1 dc in next 16 sts, joining green yarn in the end of the last st. Work 1 dc in next 16 sts in green, joining black yarn in the end of the last st. Work 1 dc in last 17 sts in black and sl st in top of ch 2 to join. (50)
At the end of Round 11, join green yarn on the last sl st. Fasten off black yarn and tie in all tails.
- Round 12: Continuing in green, ch 2 and work 1 dc in next 17 sts. *Turn, dc2tog, 1 dc in next 6 sts, dc2tog, turn, dc2tog, 1 dc in next 4 sts, dc2tog, turn, dc2tog, 1 dc in next 2 sts, dc2tog, turn, (dc2tog) 2 times, then sl st down the edge back to the main hat as neatly as you can. Work 1 dc in next 24 sts on the main hat; rep from * once more. Work 1 dc in each st to end on the main hat and sl st in top of ch 2 to join. Fasten off and tie in all tails.
Finishing
- Step 1: Using black yarn, sew a scar across the forehead of the beanie.
Bolts
Switch to the smaller hook and lighter yarn for these pieces, keeping the stitches firm enough to contain the stuffing.
- Round 1: Using grey yarn and a 3 mm crochet hook, ch 4, sl st in first ch to form a loop, work 10 dc in the ch-4 loop, and sl st in first dc to join. (10)
- Round 2: Ch 2, 1 dc in same st as previous sl st, 2 dc in each remaining st around, and sl st in top of ch 2 to join. (20)
- Round 3: Ch 2, 1 dc in each st around, and sl st in top of ch 2 to join. (20)
- Round 4: Ch 2, dc2tog to last st, then dc the last st and ch 2 together. (10)
- Rounds 5-6: Ch 2, 1 dc in each st around, and sl st in top of ch 2 to join. (10)
Leave a tail for sewing.
Assembly
- Step 1: Stuff the bolts and sew them onto the sides of the hat on the ear flaps.
Crochet Tips
- Check the crown early: Try the crown against the intended wearer after Round 5 if possible. The pattern covers a broad age range, and yarn thickness and personal tension can make a noticeable difference.
- Keep all 50 stitches: Round 7 changes the hook placement, not the stitch count. Mark the beginning of the round and count the three color sections separately if the uneven insertion points make counting harder.
- Finish color changes cleanly: Begin each color change in the final stage of the previous dc. This puts the new color on the hook before the next stitch starts and avoids an extra transitional loop.
- Stuff before attaching: Fill the bolts after their final round and before sewing. Leave the sewing tail free, use small pieces of stuffing, and stop while the fabric still has enough give to sit against the ear flap.
Ways to Adapt Your Monster Beanie
- Change the main fiber: Another super bulky yarn can replace the main yarn, but compare its thickness and spring before committing. A denser yarn may make the 50-st crown smaller, while a lofty yarn can make it roomier.
- Use light worsted for the bolts: Light worsted can stand in for DK with the 3 mm hook if the fabric stays firm. If the stitches feel too rigid to shape, move up slightly; if stuffing shows, move down.
- Hold thinner yarn together: Multiple strands can approximate super bulky yarn, but this is less predictable than using one strand. Work through Round 5 and check the fit before continuing because combined strands can produce a dense fabric.
- Soften the jagged section: For a gentler variation, use fewer lower insertion points in Round 7. Keep working exactly 16 green sts and don't add chains to bridge between different stitch heights.
- Skip the bolts: You can leave off the stuffed pieces when you want less finishing or a lighter hat. Complete the beanie and scar as written, then weave in the remaining tails.
Fixing Color Changes and Shaping
- The stitch count changes in Round 7: Place a marker in each color-change point and count 17 black sts, 16 green sts, and 17 black sts, including the beginning ch 2 as a dc. Working lower into the fabric can make a stitch easy to overlook, but it shouldn't create an extra one.
- The color joins form loose loops: Tighten the inactive strand gently after completing the first stitch in the new color. Don't pull hard enough to gather the round, especially across the 16-st center section.
- An ear flap twists: Make sure you turn after each short row and reduce at both ends as instructed. When you finish the final decreases, work the sl sts evenly down the edge rather than crowding them into one spot.
Washing & Care
Follow the washing directions on the labels for both yarns, using the instructions for the most delicate fiber. Gentle hand washing is the safest choice for the sewn scar and stuffed bolts. Press out water without twisting, reshape the beanie, and let it dry flat.
More Halloween Crochet Hats & Costume Headwear
Frequently Asked Questions
Can I adjust the beanie for a different head size?
Yes, but check the crown at the end of Round 5 before changing the pattern. The beanie is written for ages 3-10 with a 50-st crown, yet no fixed gauge is required. A small hook adjustment is the simplest option because adding or removing increase rounds would also change the placement of the 17, 16, and 17-st color sections.
Do the lower insertion points in Round 7 add stitches?
No, Round 7 must still end with 50 sts. You're changing where selected green dc stitches enter the fabric, not working extra stitches into the gaps. Count each completed dc once, even when it reaches into a lower gap or previous stitch, and preserve the 16-st green section.
Should I cut the yarn at every color change?
No, keep both colors available through Rounds 7-11 and change yarn in the final stage of the preceding stitch. Cutting at every section would create many unnecessary tails. After Round 11, join green on the final sl st, fasten off black, and secure the accumulated ends before shaping the ear flaps.
Why are there several turns inside Round 12?
The turns build each ear flap in short decreasing rows while the rest of the round remains unworked. Each row becomes narrower through dc2tog stitches, then sl sts carry you down the flap edge and back to the main hat. After 24 dc along the hat, the same shaping creates the second flap.
When should I stuff the bolts?
Stuff the bolts after completing Rounds 5-6 and before sewing them to the ear flaps. At that point the crochet is complete and the open end is still accessible. Use small portions of stuffing so you can control the firmness and keep the edge flexible enough for neat attachment stitches.
Tell me how your monster beanie turned out in the comments, especially how you handled that playful Round 7 texture! 🧶



