
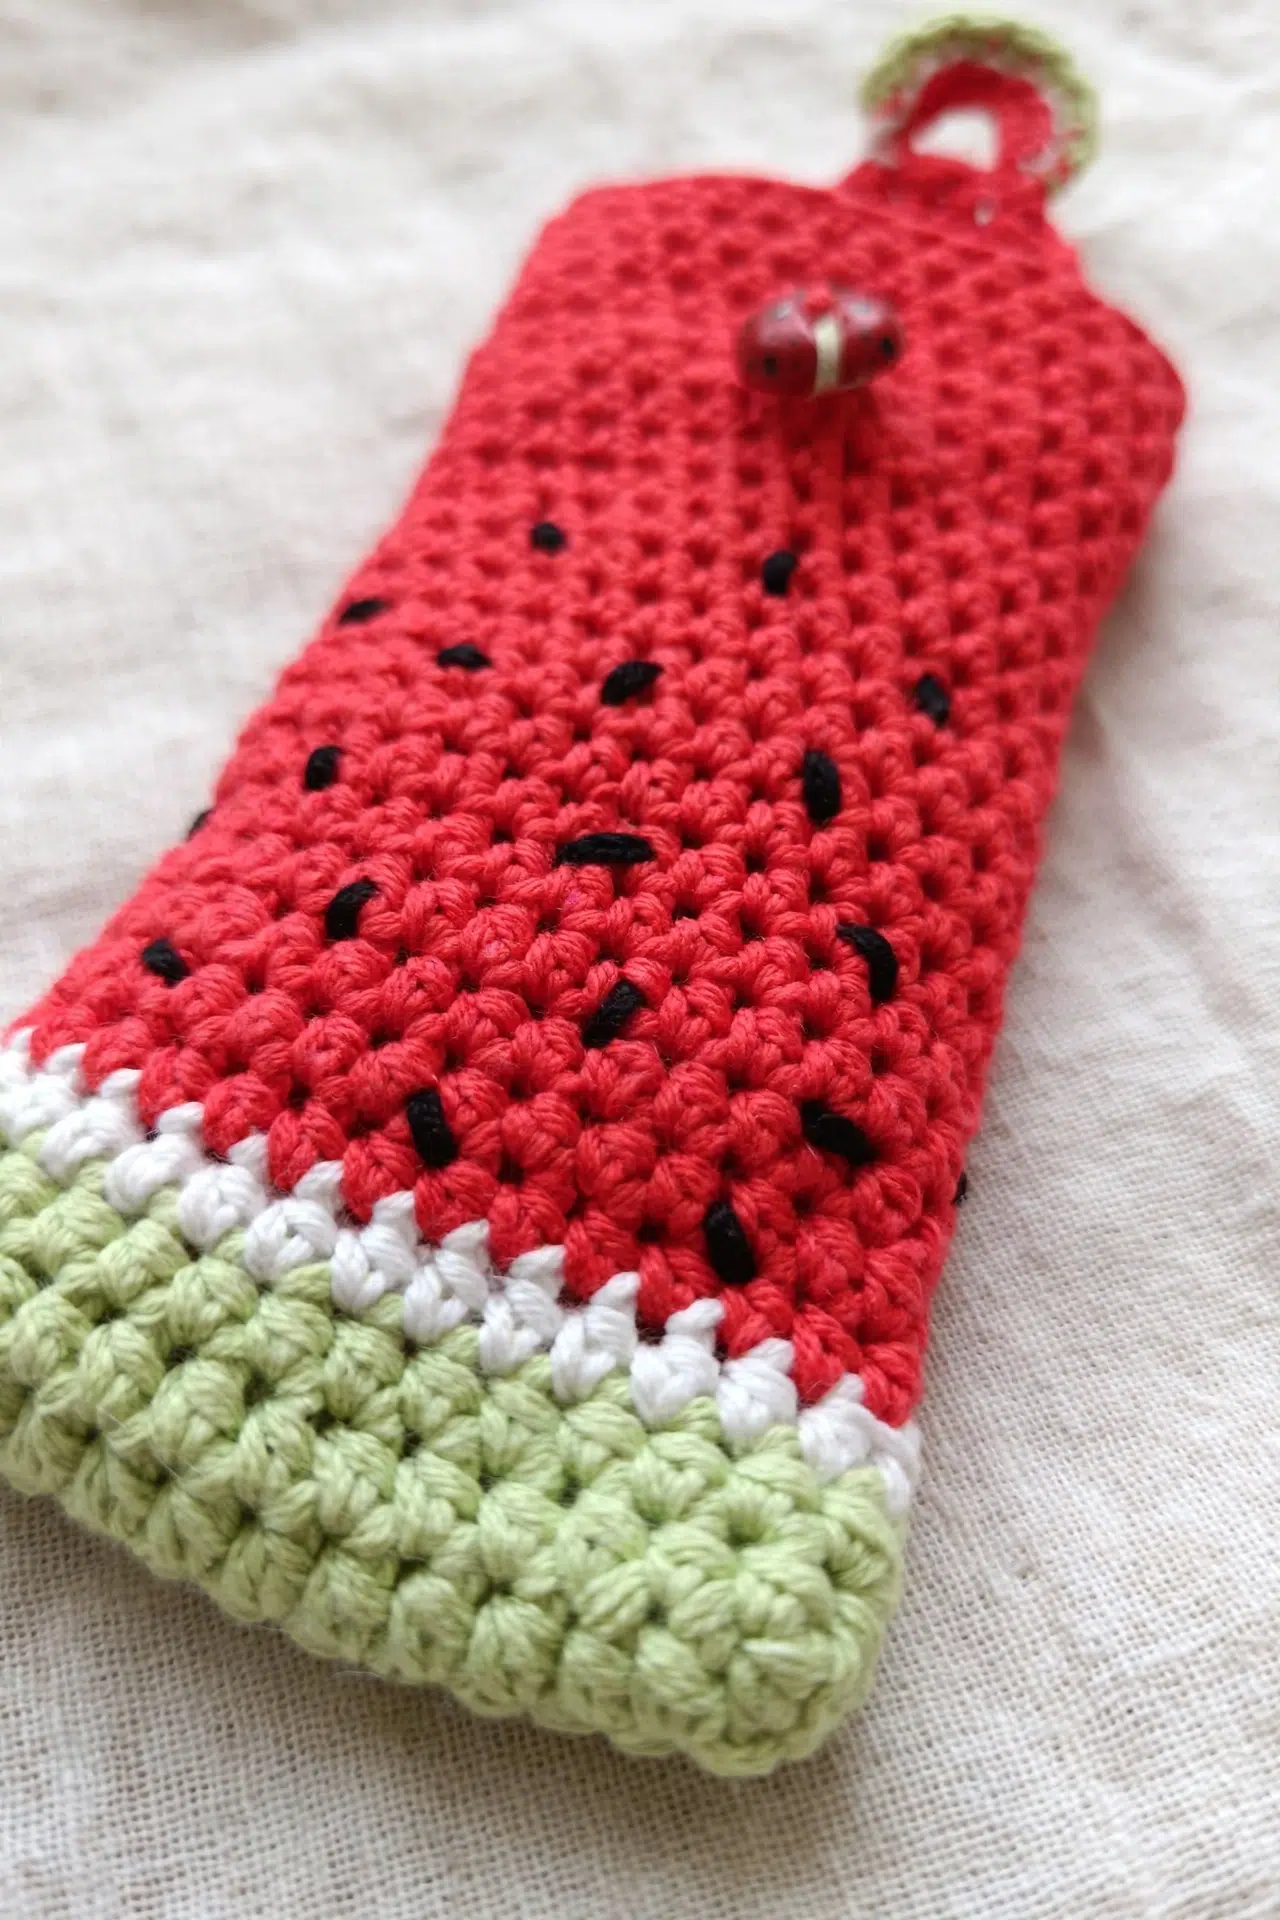
Summer called, and honestly I had to answer with something a little extra. This Watermelon Glasses Case Crochet Pattern is one of those projects that just makes sense the moment you start it. It's a practical accessory that actually gets used, and the whole thing works up faster than you'd expect for an intermediate make. If you've been looking for a fun seasonal project that isn't another dishcloth, this is it.

Jump to:
The Inspiration
I wanted to make something that felt intentional. Not just cute for the sake of cute, but actually useful. A glasses case is one of those things people reach for every single day, and making one by hand means it can actually reflect some personality. I kept thinking about summer, about something you'd toss in a beach bag or set on a picnic blanket, and this design just clicked.
It also makes a really good gift. Something handmade that someone will genuinely use is hard to pull off, and this one does it. I'd make this for a friend in a heartbeat, honestly probably already planning to.
Why This Pattern Stands Out
A functional everyday accessory that's actually fun to make and give.
- Skill level fit: Intermediate, so you get some satisfying technique without it becoming a whole ordeal.
- Quick to finish: Small enough that you can realistically complete this in a single weekend sitting.
- Gifting potential: One of those rare handmade items people will actually pull out and use daily.
- Seasonal appeal: A natural fit for summer markets, beach trips, or warm-weather gift exchanges.
- Technique value: Good practice for working in the round and shaping on a small, manageable scale.
Materials You'll Need
Four colors, one hook, and a single button. That's the whole list.
- DK Weight Yarn (4 colors: green, white, red, and black): DK weight is the right call here. It gives you enough stitch definition to see the color changes clearly without the fabric getting too stiff or too floppy. The fiber content isn't specified in the pattern, so check your label and go with what you have. Cotton holds its shape a bit more firmly, which suits a small structured piece like this. Yardage isn't listed, but for a project this size you're probably looking at somewhere in the range of 50 to 100 meters total across all four colors, with red taking up the bulk of that.
- 3.5 mm Crochet Hook: A 3.5 mm hook pairs well with DK weight and keeps the fabric tight enough that the stuffing won't show through the stitches. If you tend to crochet loosely, you might want to go down half a size.
- 1 button (approx. 1 cm): The button is part of the actual closure, so size matters here. Something close to 1 cm across will sit right. A flat two-hole button in a neutral color works fine.
- Also needed: yarn needle, scissors
Color Sequence & Yarn Changes
The color order runs green first, then white comes in partway through, and red takes over for the longest stretch of the body. Black is listed in the materials but doesn't appear in the written instructions, so it's likely used for small surface details like seeds. Keep your yarn tails long when you change colors. You'll need them for weaving in, and on a small project the ends can bunch up fast if they're cut too short.
Essential Info
A slim DK-weight case with a lace-style opening, sized to fit most standard lip balms or small cylindrical accessories.
| Skill Level | Intermediate |
| Pattern Gauge | Gauge is not critical for this project. Use a hook size that creates a firm fabric so the case holds its shape and stitches are not too loose. |
| Finished Size | Approx. 3.5 in (9 cm) wide x 7 in (18 cm) tall (estimated from starting chain and rounds/rows). |
| Yarn Weight | 3 Light / DK |
| Fiber | Not specified — check the yarn label |
| Terminology | US |
Abbreviations & Stitches Used
Short list, mostly familiar stitches with one decrease to learn.
- ch = chain
- sl st = slip stitch
- sc = single crochet
- hdc = half double crochet
- hdc2tog = half double crochet 2 stitches together (decrease): yarn over, insert hook in next st, yarn over, pull up a loop (3 loops on hook); yarn over, insert hook in next st, yarn over, pull up a loop (5 loops on hook); yarn over, pull through all loops on hook.
- st(s) = stitch(es)
- * * = repeat between * * as instructed
- ch6sp = chain-6 space
Special Stitches
- hdc2tog (half double crochet 2 stitches together): Yarn over, insert hook in next st, yarn over, pull up a loop (3 loops on hook); yarn over, insert hook in next st, yarn over, pull up a loop (5 loops on hook); yarn over, pull through all loops on hook.
Important Notes
This pattern uses US crochet terminology throughout. It's rated Intermediate, mainly because of the hdc2tog shaping and the chain-6 spaces that form the decorative opening at the top of the case. If you've worked a decrease before, you'll be fine.
Round 1 is not joined. After that, pay attention to the pattern instructions for when to join and when to continue in a continuous spiral, since the two methods affect how the rounds line up visually.
Because gauge isn't critical here, you have some flexibility with hook size. That said, go firmer rather than looser. A fabric that's too open won't hold its tubular shape, and the case won't do its job. If your stitches look airy or the fabric is floppy, drop down a hook size.
This pattern falls under the Summer and Back to School categories, so it works as a quick handmade gift or a practical make-for-yourself project. Small enough to finish in a single sitting if you keep the hook moving.
The Watermelon Glasses Case Crochet Pattern Steps
Here's how I work through this glasses case from the foundation chain all the way to the button loop.
Building the Body
The body is worked in the round from a foundation chain, which creates that oval base shape that fits a glasses case so well. You'll work through the color sequence here: green for the rind, a white stripe, then red for the main body of the watermelon.
Round 1: In green, ch 13, 2 hdc in 2nd ch from hook, 1 hdc in next 10 ch, 2 hdc in last ch, rotate work and crochet back into same ch again, starting with 2 hdc in same last ch as previous 2 hdc, 1 hdc in next 10 ch, 2 hdc in last ch. [28 hdc] Do not join round. Working back along the underside of the foundation chain is what turns a flat chain into an oval tube — make sure you're crocheting into the bottom loops of the original chain on that return pass.
Rounds 2–3: 1 hdc in each st around, join white in end of last st. [28 hdc] These two rounds finish the green rind section. Join white at the very end of Round 3.
Round 4: Continuing in white, 1 hdc in each st around, join red in end of last st. [28 hdc] This single white round is the thin stripe between the rind and the red flesh. Join red at the end of this round, ready for the long body section ahead.
Rounds 5–25: Continuing in red, 1 hdc in each st around. [28 hdc] This is the bulk of the case — 21 rounds of straight hdc in red. No shaping, no color changes. I find it helpful to use a stitch marker to track the round start so I don't lose count over this stretch.
Shaping the Top Flap
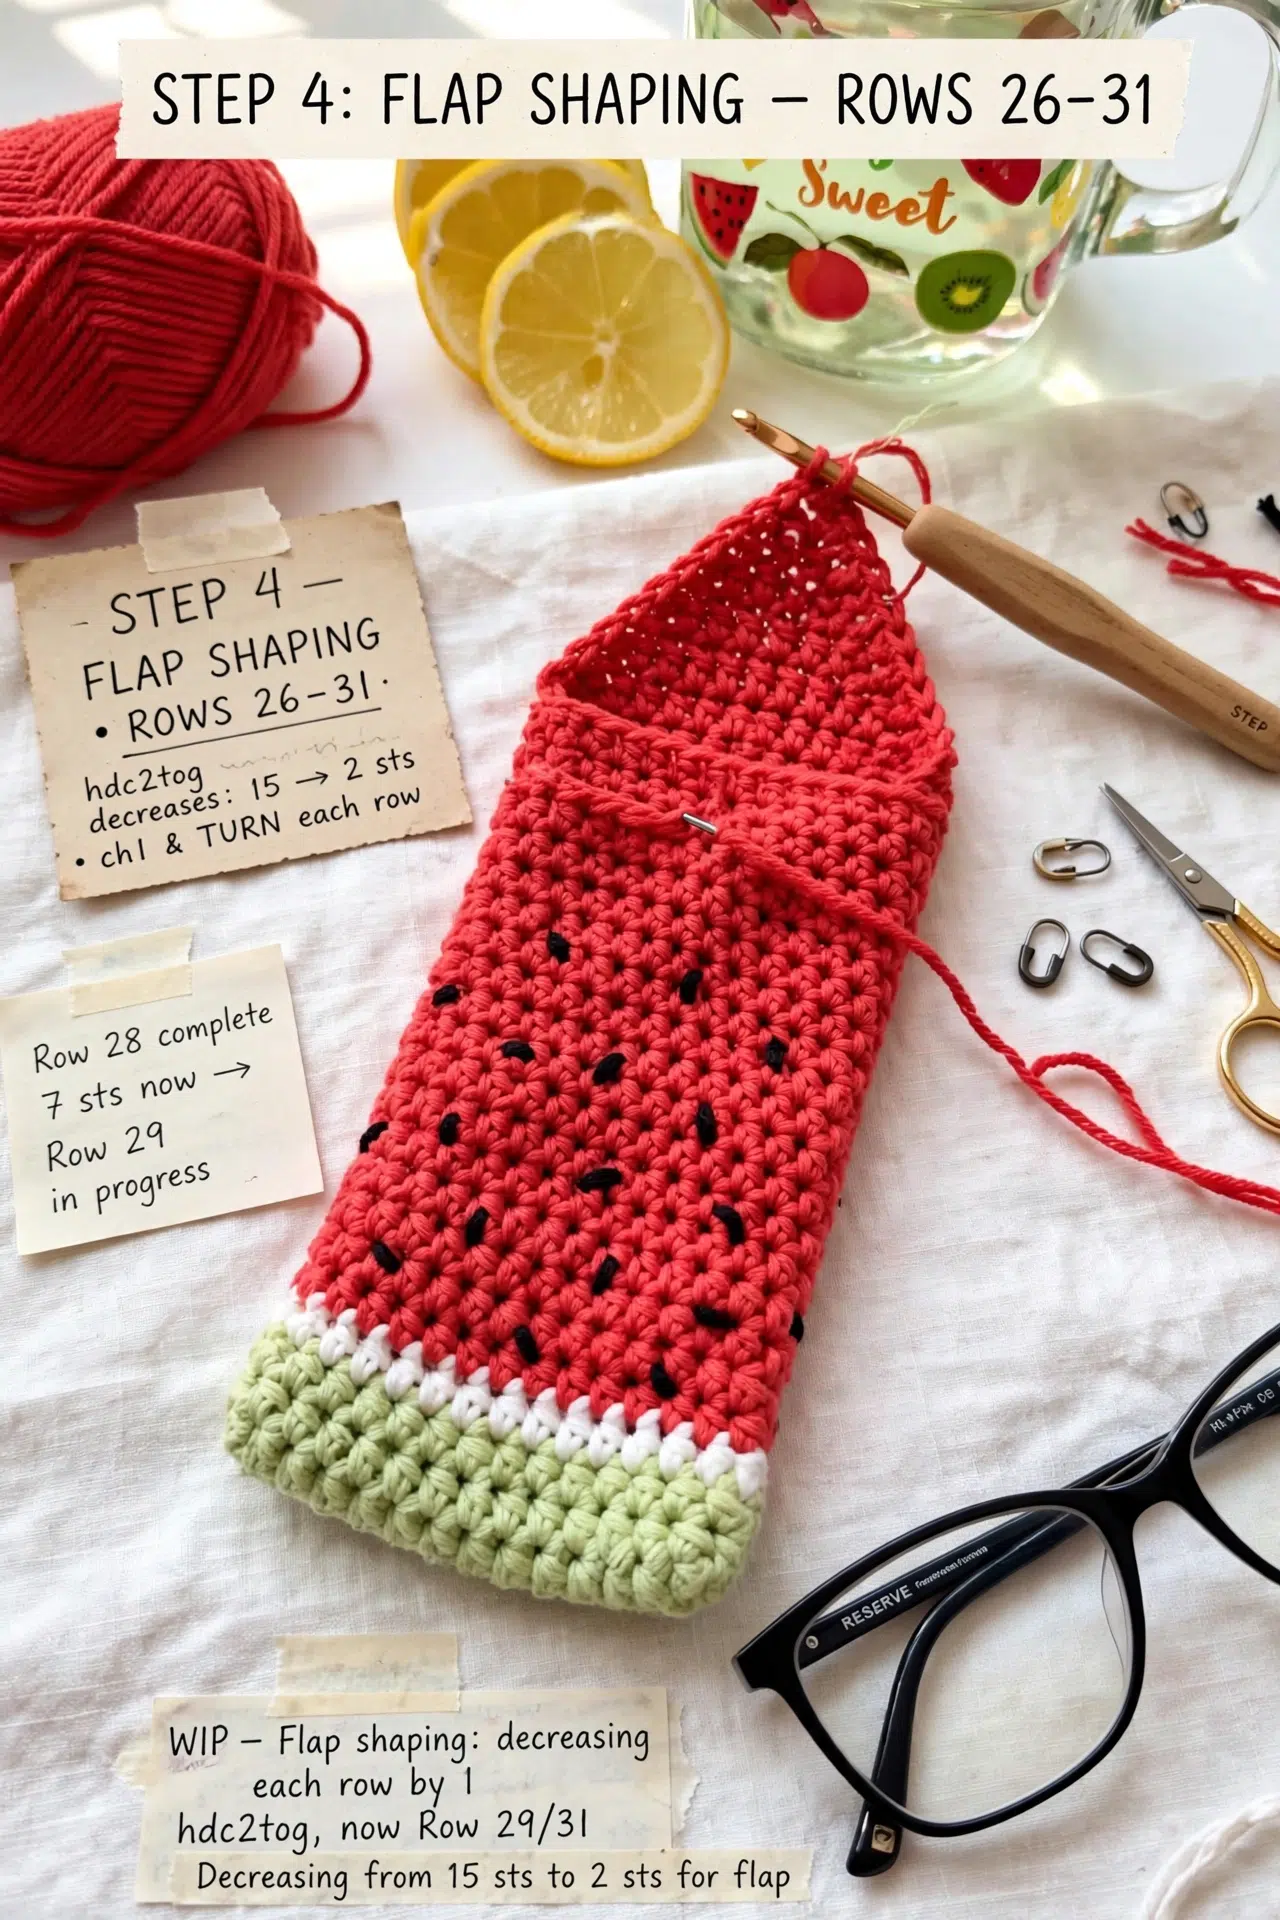
At this point the tube is done and you're switching from rounds to rows to shape the closing flap. The decreases taper the top into a rounded point, which is where the button loop will eventually sit.
Row 26: 1 hdc in next 15 sts to edge of case, ch 1, turn, hdc2tog, 1 hdc in next 10 sts, hdc2tog. [12 hdc from turning] Ch 1, turn. You're only working across half the stitches here — 15 sts gets you to the edge, then you turn and work back across those same stitches with a decrease at each end. The other half of the round just sits there as the back of the case.
Row 27: hdc2tog, 1 hdc in next 8 sts, hdc2tog. [10 hdc] Ch 1, turn.
Row 28: hdc2tog, 1 hdc in next 6 sts, hdc2tog. [8 hdc] Ch 1, turn.
Row 29: hdc2tog, 1 hdc in next 4 sts, hdc2tog. [6 hdc] Ch 1, turn.
Row 30: hdc2tog, 1 hdc in next 2 sts, hdc2tog. [4 hdc] Ch 1, turn.
Row 31: hdc2tog twice. [2 hdc] You're left with 2 stitches at the tip of the flap — these are exactly what the button loop chain attaches to.
Working the Button Hole
The button loop is built right off those last two stitches, then edged in green and white to match the rind stripe at the base. It's a small section but it goes through a few color changes, so keep your yarn tails accessible.
Step 1: Ch 6, turn, sl st in second hdc2tog, ch 1, turn. The ch 6 forms the loop itself. Slip stitching into the second hdc2tog anchors the far end of the loop before you fill it in.
Step 2: 8 hdc in ch6sp, join green with ch 1, turn. Working 8 hdc into the chain space fills the loop with stitches. Join green here to begin the color edging.
Step 3: 1 sc in next 8 sts, sl st in same st as previous sc and join white, turn.
Step 4: Sl st in next same 8 sts as previous sts used, fasten off and tie in all ends.
Step 5: Sew on button between Rounds 19 and 20 (or Rounds 6 and 7 from the top). Counting from the top is often easier at this stage since the flap is right in front of you — either way lands the button in the same spot.
Fasten off and tie in all ends.
Care Instructions
Because this case holds glasses, keeping its shape matters more than anything. Hand wash it in cool water and press out the excess gently rather than wringing it, which can distort the oval base and throw off the fit. Lay it flat to dry with your glasses case insert or a folded cloth inside so it holds its shape as it dries. The button closure is sewn on, so check that thread periodically and resew if it starts to loosen.
Frequently Asked Questions
The case is worked in a continuous spiral starting from that foundation oval, so joining would create a visible seam right at the base. Skipping the join keeps the bottom looking clean and seamless. Use a stitch marker to track where your round starts and you'll be fine.
You join the new color at the end of the last stitch in the current round rather than at the beginning of the next one. White joins at the end of Round 3, and red joins at the end of Round 4. It sounds a little backwards but it keeps the color transition tidy without a messy jog.
The loop is crocheted directly onto the top shaping at the end of the pattern. You chain 6 off the last row, work 8 hdc into that chain space, then add a round of green sc and a final round of white slip stitches over the same stitches. It becomes a small layered tab that sits at the top of the case and loops over the button.
Between Rounds 19 and 20, or if you're counting from the top, between Rounds 6 and 7 down from the opening. That placement lines up with the button loop when the case is closed. A 1 cm button fits the loop as written, so I'd stick close to that size.
The black is listed in the materials but doesn't show up in the written rounds or rows. It's almost certainly intended for adding seed details, either embroidered or surface slip stitched onto the red section after the case is finished. The pattern leaves that part up to you.
The finished case is approximately 3.5 inches wide and 7 inches tall. Most standard adult frames fit, but larger frames or thick temples might be a tight squeeze. If you're making it for oversized or chunky frames, going up half a hook size would give you a little more room without changing the overall look much.
Before You Go
This little case is one of those projects that looks way more involved than it actually is, and I love that about it. If you make one, tag me on Instagram so I can see your color choices, especially if you get creative with those seeds. And if you're saving patterns for later, this one pins really well. Drop any questions in the comments below, particularly if you run into anything with the button loop construction. That part trips people up the first time and I'm happy to walk through it.



