
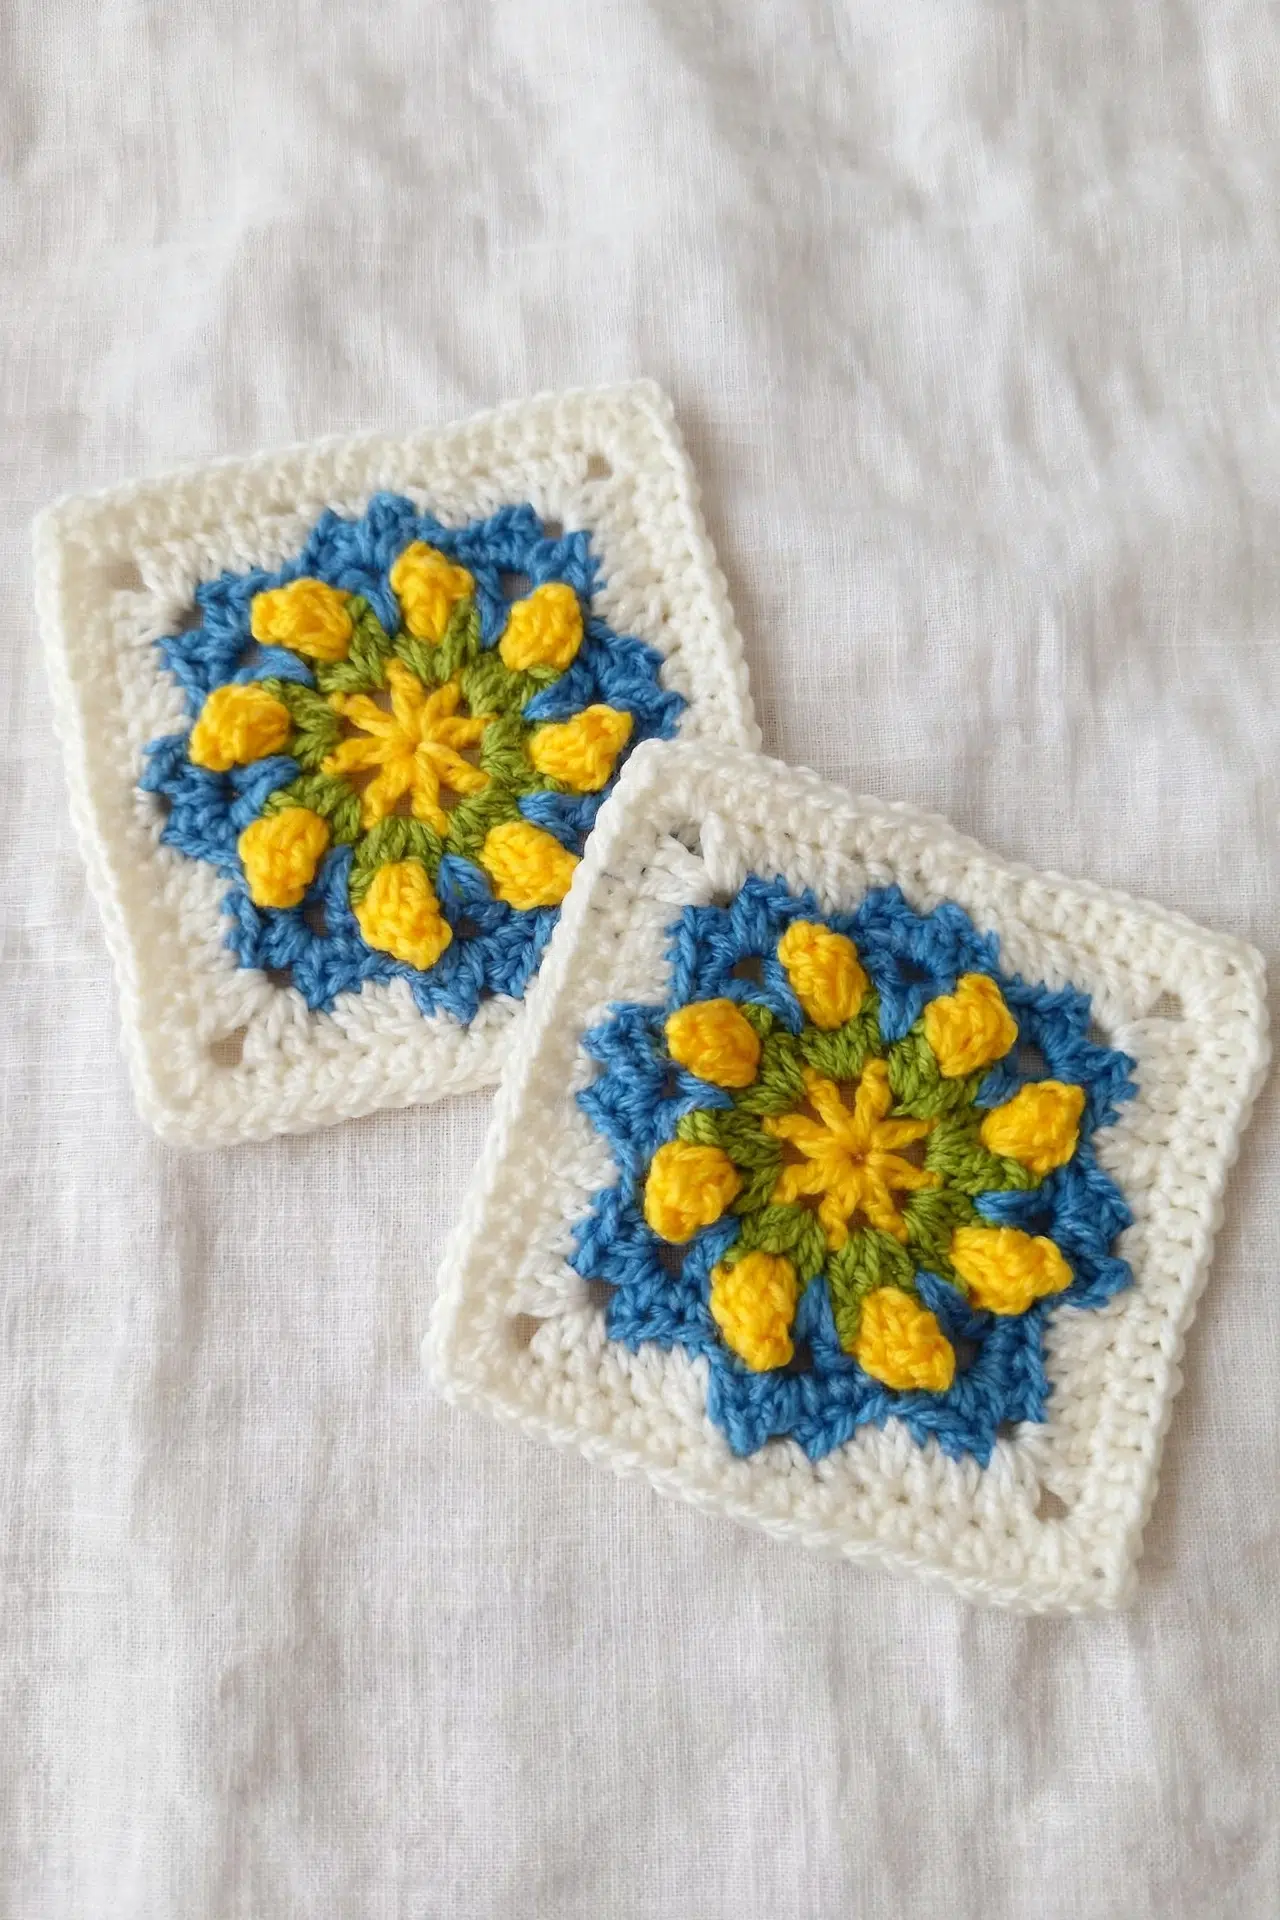
Spring has a way of making me want to pick up my hook and make something that actually feels like the season, and this Daffodil Granny Square Crochet Pattern is exactly that kind of project. It's an intermediate-level make that takes the classic granny square format and gives it a floral twist that works beautifully for home decor. I've made a lot of granny squares over the years, and this one really does feel like something special.

Jump to:
The Inspiration
I wanted to make something that felt like a proper design, not just a functional square. The daffodil motif at the center is what sold me on this one. There's something really satisfying about a granny square that has a clear focal point, where the construction itself is telling a story rather than just building outward round by round. It feels intentional.
This is the kind of thing I'd make for someone who loves their home and appreciates a handmade touch. A set of these as coasters, a few joined into a table runner, or even just a single framed piece. It suits a gift, a housewarming, a seasonal refresh. Pretty much any reason you need to make something that looks like you put real thought into it.
Why This Pattern Stands Out
A granny square that actually looks like a considered, finished piece of home decor.
- Skill-building value: Working the floral center rounds builds confidence with motif construction, a technique that carries over into a lot of other patterns.
- Versatile end use: One square works as a coaster or ornament, but multiples can be joined into something much bigger, so you can scale this to whatever you actually need.
- Gifting potential: Small, quick to finish, and genuinely impressive-looking. It's a no-trouble gift that doesn't look like a last-minute one.
- Seasonal flexibility: Spring and Easter are the obvious fit, but neutral colorways make this work year-round for home decor.
- Time investment: A single square is a manageable sit-down project, so it's easy to pick up and put down without losing your place.
Gather Your Supplies
Four colors and a single hook — that is the whole list for this one.
- DK / Light Worsted Weight Yarn in 4 Colors: DK weight yarn is the right call here because it gives you enough stitch definition to see the color work clearly without the fabric getting too stiff or too floppy. I go with a smooth DK for projects like this, something with a tight twist, because it really does make the popcorn stitches pop instead of looking soft and undefined. The pattern uses four colors total, so you don't need a ton of any single one. Exact yardage isn't broken down per color in the pattern, so pulling from scraps or partial skeins works fine. Just make sure all four are the same weight so your tension stays consistent across the rounds.
- 3.50 mm Crochet Hook: A 3.50 mm pairs well with DK weight yarn when you want a fabric that holds its shape but isn't so tight it becomes a chore to work into. It's a pretty standard pairing for this weight class.
- Also needed: yarn needle, scissors
Color Sequence & Yarn Changes
The colors follow a specific order across the rounds, so it helps to label them before you start. Color 1 does the most work: it appears in Round 1, rejoins in Round 2, and comes back again in Round 3 for the popcorn sections and rejoins. Color 2 is only used in Round 2, Color 3 handles the ch-3 corner sections and the slip stitches at the end of Round 3, and Color 4 comes in at Round 5. Cutting and rejoining rather than carrying the yarn is the cleaner approach here given how the colors are spread across rounds.
Project Info
A classic granny square with a popcorn center and a back-loop decrease detail that gives the finished square a little more texture than the standard version.
| Skill Level | Intermediate |
| Pattern Gauge | Gauge is not critical for this project. Use the stated hook size and yarn, or adjust hook size to achieve a fabric and square size you like. |
| Finished Size | Approx. 6 in (15 cm) square (estimated from DK yarn and 3.50 mm hook for a 6-round granny square) |
| Yarn Weight | 3 Light / DK |
| Fiber | Not specified — check the yarn label |
| Terminology | US |
Customizing the Size
Because gauge isn't critical here, your square size will shift naturally with your hook and yarn choices. A heavier yarn and larger hook will give you a bigger square; go down in weight or hook size and it'll come out smaller. If you're making multiples for a blanket or pillow cover, just crochet a test square first and measure it before committing to a full set.
Stitches & Abbreviations
Most of these are standard, with two stitches worth reading through before you start.
- bl = back loop
- ch = chain
- ch-sp = chain space
- dc = double crochet
- dc2bltog = double crochet 2 stitches together in back loops only (yo, insert hook in bl of next st, yo, pull up a loop, yo, pull through 2 loops; yo, insert hook in bl of next st, yo, pull up a loop, yo, pull through 2 loops; yo, pull through all 3 loops on hook)
- hdc = half double crochet
- pop = popcorn stitch (work the required number of dc in indicated st/sp; pull up loop and remove hook; insert hook in first dc of the group (or top of beginning ch), place dropped loop on hook and pull through to close popcorn)
- sc = single crochet
- sl st = slip stitch
- st(s) = stitch(es)
- tog = together
- * * = repeat between * as directed
Special Stitches
- dc2bltog: Yo, insert hook in bl of next st, yo, pull up a loop, yo, pull through 2 loops. Yo, insert hook in bl of next st, yo, pull up a loop, yo, pull through 2 loops. Yo, pull through all 3 loops on hook.
- Popcorn stitch (pop): Work the required number of dc in the indicated st/sp. Pull up the loop and remove the hook. Insert hook in the first dc of the group (or top of the beginning ch), place the dropped loop on the hook, and pull through to close the popcorn.
The Critical Details
This pattern uses US terminology throughout. The square is worked in rounds. Round 1 starts with a ch-4 loop closed with a sl st to form the center ring, but you can substitute a magic ring if you prefer a tighter, hole-free center. The hook size is 3.50 mm with DK weight yarn. If your square is coming out too stiff, go up a hook size; too loose or floppy, go down. The dc2bltog is the one stitch worth practicing on a swatch before you get into the pattern proper — working into the back loop only on a decrease takes a little more attention than a standard decrease, especially if you're moving quickly.
Step-by-Step Instructions
Work through each round in order and you'll have a finished daffodil granny square ready to use however you like.
Building the Daffodil Granny Square
This square works up in six rounds, starting from a center loop and expanding outward through the flower detail and into the square border. Each round introduces a new element, so take it one at a time.
Round 1: With Color 1, ch 4, sl st in first ch to form a loop (you can also use a magic ring), ch 4 (count first 3 ch as 1 dc), 1 dc in center of loop, *ch 1, 1 dc in center of loop* repeat 5 more times, ch 1, sl st in 3rd ch of ch 4. (8 spokes created) The ch-1 spaces between the spokes are what you'll be working into in Round 2, so keep your tension even here.
Round 2: Sl st in next ch-1 sp with Color 2, ch 3 (count as 1 dc), 1 dc in same ch-1 sp, dc in same ch-1 sp and next ch-1 sp tog, *2 dc in same ch-1 sp, dc in same ch-1 sp and next ch-1 sp tog* repeat until end, ending 2 dc in same last ch-1 sp, dc in same last ch-1 sp and beginning ch-1 sp already worked together, sl st in top of ch 3 to join, re-join Color 1. (21) The decrease between each pair of ch-1 spaces pulls the spokes together and sets up the petal structure for Round 3.
Round 3: Ch 3, 3 dc between beginning ch and next dc, pop, skip next st, join Color 3 with ch 1, [1 dc, ch 3, 1 dc] between next 2 dc (previous decrease above spoke), skip next st, re-join Color 1 with ch 1, *4 dc pop between next 2 dc, skip next st, re-join Color 3 with ch 1, [1 dc, ch 3, 1 dc] between next 2 dc, skip next st, re-join Color 1 with ch 1* repeat around, sl st behind first flower popcorn st with Color 3, sl st in next st. You're alternating between Color 1 popcorns and Color 3 corner arches all the way around, so keep both colors accessible. The popcorn sits above each petal cluster, and the ch-3 arches in Color 3 will become the corner spaces in the rounds ahead.
Round 4: Starting in the same st as previous sl st, *1 sc in next st, [1 hdc, 1 dc, ch 2, 1 dc, 1 hdc] in next ch-3 sp, 1 sc in next st* repeat around, sl st in first sc, sl st up to next ch-2 sp. The shell worked into each ch-3 sp frames the corner, and the sl sts at the end position you at the first ch-2 sp ready for Round 5.
Round 5: Join Color 4 with ch 1 and starting in the same ch-2 sp as previous sl st, *2 sc in next ch-2 sp, skip next st, 1 hdc in next bl, dc2bltog, 1 dc in next 2 bl, [2 dc, ch 2, 2 dc] in next ch-2 sp, 1 dc in next 2 bl, dc2bltog, 1 hdc in next bl, skip next st* repeat around, sl st in first sc. Working into the back loops only on the side stitches gives the square a subtle ridge and keeps the fabric from pulling. The [2 dc, ch 2, 2 dc] at each corner ch-2 sp establishes the square shape.
Round 6: Ch 1 (do not count as a st), 1 hdc in same st as previous sl st and in each st across up to next ch-2 sp, [2 hdc, ch 2, 2 hdc] in ch-2 sp, *1 hdc in each st across to next ch-2 sp, [2 hdc, ch 2, 2 hdc] in ch-2 sp* repeat around, ending 1 hdc in each remaining st to end, sl st in first hdc to join. Fasten off and tie in all ends. (72)
Fasten off and tie in all ends.
Blocking
Granny squares almost always benefit from a light block, and this one is no different. Because the popcorn stitches in Round 3 can pull the center in a little, blocking helps the square sit flat and the corners open up properly. I wet block mine: soak the finished square in cool water, gently squeeze out the excess (no wringing), then pin it to a foam mat to the finished dimensions and leave it to dry completely. Since the fiber isn't specified here, check your yarn label before you do anything. If it's acrylic, skip the soak and use a steam iron held just above the surface instead.
Care Instructions
Your yarn label is going to be your best guide here since the fiber content isn't fixed for this pattern. That said, whatever yarn you used, lay the finished square flat to dry after washing. The popcorn texture can get a little misshapen if it's bunched up wet, and laying it flat keeps those raised stitches looking crisp. If you're joining multiple squares into a larger project, check that all your yarn colors are colorfast before washing everything together.
Frequently Asked Questions
They form the raised daffodil flower centers at each corner of the square. Round 3 alternates between Color 1 popcorn clusters and Color 3 corner sections, so the popcorns sit in the middle of each side and create that dimensional petal effect. It's a fairly specific construction, so reading through Round 3 before you start that round is worth the extra minute.
Round 3 has the most involved color work: you're re-joining Color 1 and Color 3 multiple times within the same round. I cut and re-join rather than carrying the yarn, because the distances between re-joins are long enough that carrying would show through. Yes, it means more ends to weave in, but the finished result is much cleaner.
It's a back-loop-only double crochet two together decrease. You insert your hook through the back loop only of the next stitch, pull up a loop, then do the same in the following stitch, and complete both as one dc. Round 5 uses back loops throughout, which creates a subtle ridge and gives the outer border a little more structure.
Yes, the pattern notes that option directly. A magic ring works the same way here: work your 8 spokes into the ring, then pull it closed before continuing to Round 2. Either start gives you the same result, so use whichever you're more comfortable with.
Quite a few. With four colors and the multiple re-joins in Round 3 alone, you're looking at somewhere around 10 to 14 ends per square depending on how you handle your joins. A yarn needle with a bent tip makes the process faster. I weave mine in as I go rather than saving them all for the end.
Now It's Your Turn!
I'd love to see which color combinations you land on for this one because the four-color layout really does change the whole feel of the square. Save this pattern to Pinterest so you can find it again when you're ready to make a second (or twelfth) square, and if you share yours on Instagram, tag me so I can see it. Drop any questions in the comments below too. Round 3 trips people up the first time through and I'm happy to help you work it out.



