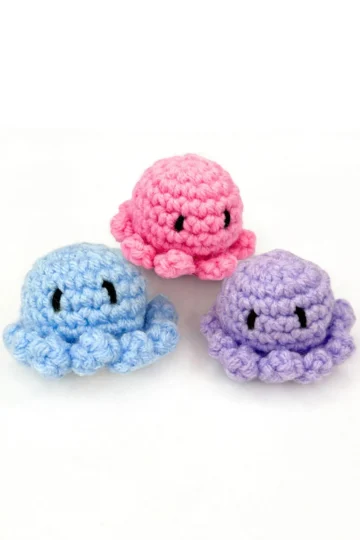
If you've got a basket of yarn scraps staring at you, this is the project that finally puts them to use. This little octopus comes together fast, doesn't ask much of you skill-wise, and still turns into something genuinely cute by the time you tie off the last tentacle. It's a great one to keep in your back pocket for quick gifts too.
Quick Overview & Materials
Yarn: Worsted weight acrylic yarn, plus a small amount of black yarn for sewing on the eyes.
Hook: A 3.5mm crochet hook.
Also needed:
- Scissors
- A tapestry needle
- Filling for stuffing — polyfill works great, or you can use yarn scraps like this pattern does, which is a nice way to use up small leftover bits you don't know what else to do with
Skill level: Beginner-friendly. Every stitch used here (single crochet, increases, decreases, and working in the back loop only) is walked through step by step, so this is a great project if you're newer to amigurumi.
Stitch Abbreviations Used
- sc – single crochet
- st(s) – stitch(es)
- ch – chain
- sl st – slip stitch
- inc – increase (2 single crochets in the same stitch)
- dec – decrease (single crochet two together / sc2tog)
- BLO – back loop only
Getting Started: The Faux Magic Ring
This pattern uses a simple slip knot and chain method instead of a traditional magic ring, which makes it a little friendlier if you're still getting comfortable with amigurumi basics. A regular magic ring works too if that's what you prefer — either one will get you the same result.
- Make a slip knot and place it on your hook.
- Chain 2 total.
- Trim your yarn tail down a bit so it stays out of the way as you work.
- Work 6 single crochets into that very first chain you made (not the second chain from the hook — the very first one).
To make each single crochet: insert your hook into the chain, yarn over and pull up a loop (2 loops on your hook), then yarn over again and pull through both loops. Repeat this 5 more times into that same first chain, for 6 single crochets total.
Round 1
Finish the round by slip stitching into the very first single crochet you made at the start of the round. Then find your yarn tail at the back of your work and pull on it to snug the circle closed a bit.
Round 2
Chain 1 (this does not count as a stitch). Work an increase (2 single crochets) into every single stitch all the way around. You should end this round with 12 single crochets total. Finish by slip stitching into that very first single crochet of the round.
Round 3
Chain 1 (does not count as a stitch). This round alternates: work an increase into the first stitch, then a regular single crochet into the next stitch, then an increase into the next stitch, then a single crochet into the one after that — continue that alternating pattern all the way around. You should end this round with 18 single crochets total. Finish with a slip stitch into the first single crochet of the round.
Round 4
Chain 1. This round is worked with no shaping at all — just 1 single crochet into every stitch, all the way around. You should end with 18 single crochets total, the same count as round 3. Finish with a slip stitch into the first single crochet.
You'll notice your piece starting to curl up a little here — that's exactly what you want to see happening.
Rounds 5–7
Repeat round 4 (chain 1, then 1 single crochet in every stitch all the way around, ending with 18 stitches total, closed with a slip stitch) for three more rounds, until you have 7 rounds total completed.
Round 8: The First Decrease Round
Chain 1. Work your first single crochet into the first stitch. Now, instead of an increase, you're going to work a decrease (single crochet two together):
- Insert your hook into the next stitch, yarn over, and pull up a loop — but don't finish the stitch.
- Insert your hook into the following stitch, yarn over, and pull up a loop. You should now have 3 loops on your hook.
- Yarn over and pull through all 3 loops. That completes your decrease.
Alternate a regular single crochet with a decrease all the way around the round (1 sc, then 1 dec, then 1 sc, then 1 dec, and so on). You should end round 8 with 12 single crochets total. Finish with a slip stitch into the top of that first stitch you made.
Adding the Filling
Before starting the next round, add your filling now — polyfill works well, or yarn scraps, whichever you have on hand. Tuck it into the body so it's nicely filled before you close things up.
Round 9: Closing the Body
Chain 1. This round is worked in the back loop only of each stitch — the loop of the stitch that sits furthest away from you (the loop closest to you is the front loop, which you'll be leaving unworked here, since those front loops are what the tentacles will attach to later).
This entire round is decreases only, worked all the way around with no regular single crochets in between, always going into the back loop for each decrease. Continue decreasing all the way around, then finish the round with a slip stitch into that very first stitch of the round.
Closing the last bit of the hole: If there's still a small gap after that slip stitch, work one more slip stitch into the stitch directly across from where you just finished, which will close it up the rest of the way.
Tying Off the Body
Chain 1, then cut your yarn. Pull the yarn all the way through that last chain and pull it tight. Trim the tail down a bit more and weave it into the center of your project to hide it.
Adding the Tentacles
The tentacles are worked into the front loops that were skipped during round 9 — you'll see a little circle of open loops around the base of your project. You'll work into these loops all the way around to create each tentacle.
- Reattach your yarn to any one of those front loops by pulling it through and tying it on.
- Go back into that same loop and pull up a loop with your working yarn. (Make sure your project is facing the correct way — right side out — before you continue.)
- Chain 5.
- Work 1 single crochet into each of those 5 chains, starting in the second chain from the hook. This gives you 4 single crochets total for that tentacle.
- Move into the next front loop over and work a slip stitch into it.
- From that same loop, start your next tentacle: chain 5, then work 1 single crochet into each chain starting from the second chain from the hook, for 4 single crochets again.
- Slip stitch into the next loop over, and continue this same process — chain 5, 4 single crochets down the chain, slip stitch into the next loop — repeating all the way around until you've worked into every front loop and are back where you started.
Finish by slip stitching into that last loop.

Tying Off the Tentacles
Chain 1, cut your yarn, pull it all the way through that chain, and pull tight. Trim down the yarn tails and weave them into your project to hide them.

Adding the Eyes
Thread your tapestry needle with a small length of black yarn.
- Insert your needle in through the side of your project, and bring it out where you want the bottom of your first eye to sit. Don't pull it all the way through — leave a bit of the tail sticking out at the entry point.
- Go up one row from where you came out, then bring your needle across and out at the spot where you want the bottom of your second eye to sit.
- From there, go up one row again, then bring your needle all the way back across and out through that very same stitch you first went into.
This creates your two simple eyes, each one row tall. Once you're happy with the placement, cut your yarn and tie it off in a knot. Trim the tails down, then use the side of your crochet hook to gently push that knot down into your project so it disappears inside.
And that's it — your octopus is complete! A quick, scrap-friendly project that comes together in one sitting and makes for a genuinely sweet little handmade gift.